We're Parents

  • Home
  • About Us
    • About Us
    • Privacy Policy
    • Contact Us
    • Disclosures
    • Media Kit
  • Parenting
    • Pregnancy and Postpartum
    • Breastfeeding
    • Car Seat Safety
    • Mental Health
    • Babies
    • Toddlers
    • School Age
    • Older Kids
    • Holiday Crafts & More
    • Green Living
  • Recipes
    • Breakfast
    • Lunches
    • Dinner
    • side dishes
    • Crockpot
    • Desserts
    • Lactation Recipes
    • Snacks
    • The Seasoned Kids (Recipes by Kids)
  • Travel
    • Kid Friendly Outings
    • Restaurants
    • Travel Tips

Pizza Cake

June 8, 2017 by Larisha Campbell Leave a Comment

Growing up, Andrew and I were never the class clowns. However, we both enjoy a good prank every now and again.  We’ve done some silly stuff in the almost decade that we’ve been together. What’s even funnier though is now pulling pranks on our kids. The pure belly laughter that you get when your little one laughs is the best sound in the world. We love it. We jump out and scare them.  We’ve sprayed them with water when they weren’t expecting it. Pushed their face into a piece of cake when they went to take a bit, ensuring that icing went all over their face. 

Good, fun, humorous pranks. Serenity is getting to be the age that’s it’s even funnier.  She even tries to play her own pranks sometimes. Her favorite thing to do right now is to put toys in our shoes. She literally bursts out in laughter when we try to put our shoes on and realize there’s something inside. She also occasionally blames her sister. However, her laughter kind of gives her away.

This is how our family works to “Unbottle Laffter”. Right now Tampico beverages is working to promote the new DreamWorks’ movie “Captain Underpants: The First Epic Movie” (which is full of pranks!) to make sure every family gets together to “Unbottle Laffter” in their own home. Tampico is also introducing a fun, Captain Underpants themed contest on its Facebook page. Keep reading to learn more.

It was time to up the anti.

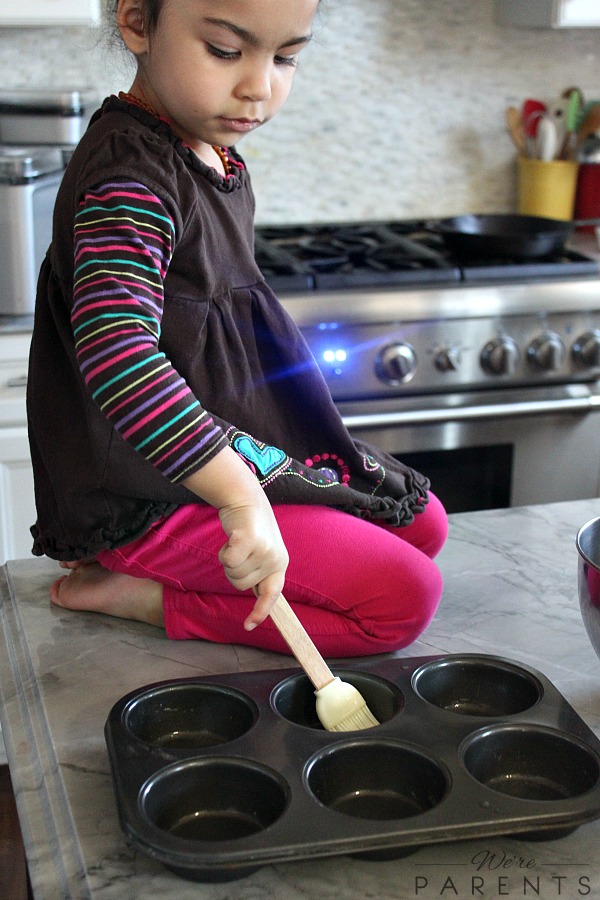
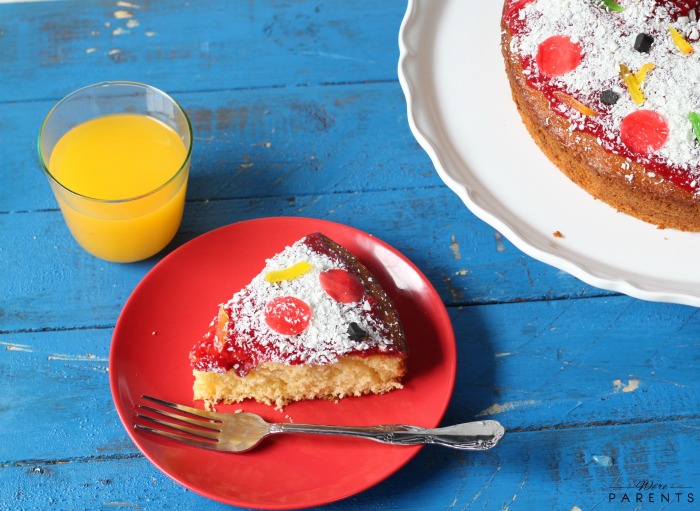
To celebrate the new Captain Underpants movie, we realized that we needed to take up our pranks a bit with her. Again, we don’t want to do anything harmful, but we want our house to be full of laughter and fun. We’ve never done prank food before, but I know a friend that gave her family cupcakes that were really mashed potatoes and meatloaf. Serenity’s favorite food is pizza, so we decided to make a cake that looked like pizza.  We wanted her to be included in the fun day, so we ended up telling her what we were doing, but she was a bit confused until the end product was done.  She then proclaimed, “It really does look like a pizza!” #Winning We all know if a kid says it’s so, it is.

Making the pizza cake

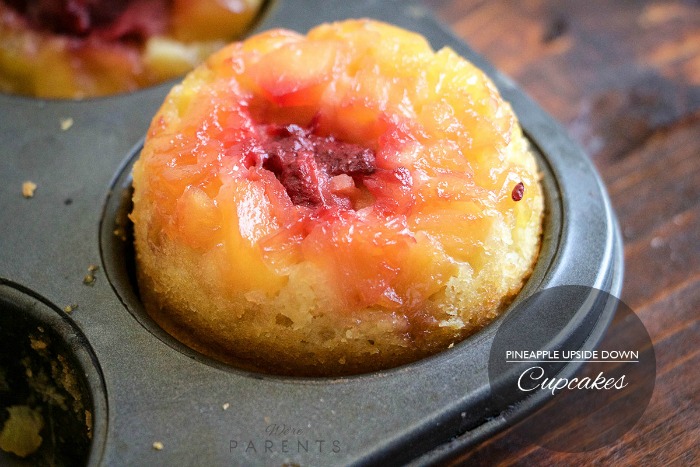
It actually isn’t that hard to make this pizza cake. The girls said it was so delicious. It’s a bit on the sweet side and Serenity declared that she’s never eating black licorice ever again. Otherwise amazing.  We did use a box cake mix for this recipe, but you could totally use for your favorite homemade cake recipe too.  The key with this cake recipe though it that we used Tampico Citrus Punch in place of the water the recipe calls for. The Tampico juice gives it such a sweet citrus flavor that it really makes this whole cake come together perfectly.


Here’s the full recipe:

0 from 0 votes
Print
Pizza Cake
Author: Larisha Campbell
Ingredients
  • 1 Box Yellow Cake Mix
  • 1/4 cup oil*
  • 3 whole eggs*
  • 1 cup Tampico Citrus Punch juice*
  • 1 can cherry pie filling
  • 1 white chocolate bar
  • fruit leather
  • red yellow, green, and orange gum drops
  • black licorice
Instructions
  1. *Bake cake according to directions, replacing water with Tampico Citrus Punch juice. Our recipe called for 1/4 cup oil, 3 whole eggs, and 1 cup liquid.
  2. One done, remove from oven and let cool completely.
  3. While cool, add half the can of cherry pie filling to a food processor and pulse until it resembles and chunky marinara sauce. Set aside.
  4. Using a cheese grater, grate a white chocolate bar. You need approximately 1/4 cup of grated chocolate.
  5. Lay fruit leather out in a single sheet. Cut small circles out. *We used the large end of a metal cake piping tip to cut easily.
  6. Using a rolling pin, roll out 2 of each color gum drops. Cut in very thin slices.
  7. Chop up the black licorice.
Time to Assemble
  1. Spread cherry pie mixture on top of a cooled cake
  2. Sprinkle with grated chocolate
  3. Top with sliced gum drops, round fruit leather pieces, and chopped black licorice. (Peppers, pepperoni, and olives)
  4. Serve immediately or cover in air tight container up to 3 days.

This is how our family works to “Unbottle Laffter”.

In partnership with DreamWorks’ animated comedy “Captain Underpants: The First Epic Movie,” Tampico Beverages, one of the world’s leading beverage brands, is introducing its “Unbottle Laffter” contest. Participants can enter now through 11:59 p.m. EST July 13 by visiting Tampico’s Facebook Page and commenting on a contest post. The first 20 entrants to respond to a contest post will receive a family pack of movie tickets. Additionally, every entrant will be automatically entered for a chance to win the Grand Prize: a pair of tablets for laughing, learning and enjoying life together. The grand prize winner will be announced July 14. Participants are also invited to enjoy Tampico’s Prank Board, a collage of hilarious sounds in the style of Captain Underpants.

Participation is easy:

  1. Every two weeks, visitors of Facebook.com/DrinkTampico may enter the contest by providing creative responses to irresistibly silly superhero requests posted to the page.
  2. The first 25 entries to every contest post will be awarded with a family four-pack of movie tickets valued at $50 via Fandango.
  3. Every participant is automatically entered into the sweepstakes for the Grand Prize: a pair of tablets (Large “Superhero” and Mini “Sidekick” size). 

The Prank Board can be accessed by all at: UnbottleLaffter.tampicoiscolor.com.

Participants must be age 17 or older to be eligible. For more information, including no-purchase entry, visit TampicoIsColor.com.


Filed Under: Desserts, Home, Recipes Tagged With: cake, desserts, jokes, recipes

Carrot Cake with Maple Cashew Frosting

March 20, 2017 by Larisha Campbell Leave a Comment

One of my main goals, after just keeping the girls alive, is to get them to have an extremely versatile palate when it comes to food.  I want them growing up and constantly tasting new things, challenging their senses, and grow up loving all types of different things. This Carrot Cake with Maple Cashew Frosting was something that I would have never touched at their age. I wouldn’t have even touched it as a high school student. But yet, here we are, making this carrot cake together as a great brunch dessert for Easter, and my kid’s gobbled it up.

Think about it…growing up, you weren’t touching Aunt Sally’s carrot cake when you saw real carrots in the cake. Who’s eating that? I barely ate the vegetables on my plate, really only because I was forced too, yet here we are and you think You’re going to be able to get me to eat some?  You must have lost your mind. 

But seriously, a lot of us didn’t/don’t eat carrot cake.

I don’t actually recall the first time I did try a carrot cake, but I remember being like DOH. Why did I never have this before, it’s actually really good!

Our homemade version carrot cake from scratch is insanely easy to make and our girls loved licking the beaters clean. It was my favorite thing to do as a kid and I love sharing in their joy as they do it now (Andrew, however, thinks we are nuts because he was never allowed to do it growing up). The only downside is that I don’t get one for myself anymore.


The baby is really getting involved more in the kitchen and it’s absolutely adorable to see her excitement as she stirs and mixes things together. There’s no greater feeling than watching the joy on your child’s face. I love that she’s learning at such a young age also.

Tip Time!

The carrot cake recipe is super easy to make. We make it a bit healthier by subbing in applesauce instead of using oil, which does make for a denser cake.  If you aren’t a fan of that, definitely try making it with coconut oil instead.

Always fold in your carrots.  You don’t want these being mixed earlier because they will stick to the beaters and become super annoying. Trust me from experience. 

Always make your frosting ahead of time.  It takes awhile to make maple cashew frosting, as the cashews need to soak in water, so don’t wait!

One of my favorite cake tips to share is that as soon as your cake is cool enough to touch, but still very warm, take plastic wrap and wrap up the cake. Then put in the freezer until completely cooled.  This allows for all the steam to stay trapped inside the cake, allowing for a very moist cake.

The blend of homemade carrot cake mixed in with the maple cashew frosting is such an amazing combination.  We can’t wait to eat it again!

0 from 0 votes
Print
Carrot Cake with Maple Cashew Frosting
Author: Larisha Campbell
Ingredients
  • 1 cup sugar
  • 1 cup applesauce
  • 3 eggs
  • 1 tsp vanilla
  • 2 cups flour
  • 2 tsp cinnamon
  • 1/2 tsp baking soda
  • 1/2 tsp baking powder
  • 1/4 tsp salt
  • 2 1/2 cups shredded carrots
  • 1 cup finely chopped walnuts
Maple Cashew Frosting
  • 2 cup cashews
  • 1 tbsp + 1 tsp vanilla
  • 1/2 cup maple syrup
  • 1/4 tsp pink salt
  • 2 tsp cinnamon
  • 1/8 tsp cardamom
  • 1 tsp lemon juice
  • 2 tbsp coconut oil
  • nutmeg
Instructions
  1. Heat oven to 350 degrees.
  2. Grease bottom and sides of 13x9 pan with coconut oil.
  3. In a large bowl, mix sugar, applesauce, vanilla, and eggs for 30 seconds.
  4. Add flour, cinnamon, baking soda, baking powder, and salt.
  5. Beat for 1 minute.
  6. Fold in carrots and nuts.
  7. Pour into greased pan.
  8. Cook 30-40 minutes
  9. Cool for 10 minutes, remove from pan, cool completely.
Maple Cashew Frosting
  1. Soak cashews in water for 1 hour. Water should cover cashews.
  2. Strain cashews from water
  3. Add to food processor with maple syrup until smooth
  4. Stir in remaining ingredients.
  5. Spread on top of cooled cake.
  6. Sprinkle nutmeg on top of frosting.
  7. Serve!

ENJOY!

Here’s some things that could help you with your cake making!


NEED MORE IDEAS FOR EASTER!?  

HERE’S 25 EASTER RECIPES FOR THE ULTIMATE MENU! 

Filed Under: Desserts, Home, Recipes Tagged With: cake, desserts, Easter, holidays, homemade, recipes

Pineapple Upside Down Cupcakes

April 18, 2016 by Larisha Campbell Leave a Comment

pineapple upside down cupcakes

I remember growing up that having a Pineapple Upside Down cake was always a special treat. For some reason, I grew up thinking that it was some sort of difficult recipe to make.  I mean it had to be right?  You had to magically make this cake that after you baked it and inverted it that there were these pineapples and cherries perfectly and symmetrically placed on the, now top, of this cake.  It was like some sort of magic.

I can’t be the only one who thought this growing up was I?

Fast forward to about a year ago, and I finally realized that not only was this sort of cake insanely easy to make, but that making your own cake batter (no, not out of the box) was really easy as well.  WHY HAD I NEVER TRIED TO MAKE A CAKE FROM SCRATCH BEFORE!? Annnndddd….why did I not know that there were other fruit combinations to make upside down cakes with!? WHYYY had people been hiding this secrecy from me!?

mini chef mondays pineapple upside down cupcakes

My vow to my girls —>>> make all the upside down cake things while they are growing up.

Last Christmas, we went over to Andrew’s brothers house and his sister had made pineapple upside down cupcakes.

WHATTTT!?

mini chef mondays making pineapple upside down cupcakes

Again, I was left with this feeling of why? Why did I not know or even think of this before? So, I was determined to make them at home.  This recipe make 12 large cupcakes, so if you wanted them smaller you could definitely adjust for that.  They would be adorable as mini cupcake bites. We use strawberries in this recipe instead of cherries because not only is the flavor combination delicious, but *most* store bought cherries have a ton of red dye in them and we try to avoid dyes in our home. Also, because I once saw a documentary on how maraschino cherries are made and it weirded me out HAHA.

Anywho…. We made a family day out of this one and we all pitched in to help make these Pineapple Upside Down Cupcakes.  Well, Baby just really enjoyed screaming until someone put more food in her mouth. Skibbles was so confused about why we were putting fruit in the bottom of the pan when I told her we were making cake and kept saying, “no, mama, I want cake”.  Luckily, she eventually saw that we really were making pineapple upside down cupcakes and the meltdown didn’t last too long.

how to make pineapple upside down cupcakes

0 from 0 votes
Print
Pineapple Upside Down Cupcakes
Author: Larisha Campbell
Ingredients
  • 1 1/3 cup flour
  • 1/2 cup unsalted butter melted, divided
  • 1/2 cup whole milk
  • 1/4 cup vanilla greek yogurt
  • 3/4 cup brown sugar + 1 tbsp divided
  • 1/4 cup white sugar
  • 1/2 tbsp vanilla extract
  • 1 1/2 tsp baking powder
  • 1/4 tsp salt
  • 1 egg
  • 1/2 pint canned pineapple finely chopped (1/2 can crushed if store bought)
  • 3 large strawberries halved
Instructions
  1. *For the following recipe, we made 6 large cupcake. Adjust accordingly to make smaller ones.
  2. Preheat oven to 350 degrees.
  3. In the bottom of each cupcake tin, brush 1/4 cup melted butter evenly amongst the 6 tins.
  4. Evenly divide pineapple in a ring along each tin and place one half of a strawberry in center of pineapple.
  5. Take 1 tbsp brown sugar and evenly sprinkle on top of pineapple/strawberry mixture.
  6. In a bowl, mix remaining dry ingredients together with a whisk.
  7. Then add wet ingredients and whisk together until no lumps remain.
  8. Evenly divide mixture to each tin.
  9. Bake 25-28 minutes or until golden brown and toothpick inserted comes out clean.
  10. Remove and let sit for 3 minutes.
  11. Invert pan onto a baking sheet and carefully remove.
  12. Let cool, serve immediately.

Don’t they just look delicious!?  What other flavors of “upside down” desserts have you made?

pineapple upside down cupcakes recipe

MCM Blogs

I am hosting Mini Chef Mondays along with 8 fabulous bloggers! Read how Mini Chef Mondays started, plus how to link up!
Join our facebook group to find even more recipes and share recipes too!

Get featured and follow us too!
  • Pinterest: Each post/recipe linked up will be added to our Mini Chef Mondays board
  • Instagram: Use our hashtag #MiniChefMondays so we can repost your mini chef
  • Twitter: We retweet every post with #MiniChefMondays

Be sure to check out each of their Mini Chef posts as well!

  1. Banana Split Smoothie // Courtney’s Sweets
  2. Old Fashion Lemonade Recipe // Momma Lew
  3. Homemade Limeade // Baby Loving Mama
  4. Pineapple Upside Down Cupcakes // We’re Parents
  5. Encouraging Fruits and Vegetables for Kids // Eating Richly Even When You’re Broke
  6. Cookies & Cream Milkshake // Giggles, Gobbles and Gulps
  7. Easy Spinach Manicotti // Vegging at the Shore
  8. Make Your Own Omelette Bar // O’Boy! Organic
  9. Dinosaur Fossil Cookies // Can’t Google Everything

An InLinkz Link-up


Filed Under: Desserts, Home, Kids In The Kitchen, Recipes Tagged With: cake, cupcakes, mini chef mondays, recipes

Raspberry Chocolate Cake Recipe

January 25, 2016 by Larisha Campbell 2 Comments

valentines day mini raspberry chocolate cake recipe

Love is in the air.  It’s so close to Valentine’s Day that I can almost taste the chocolate, actually maybe that’s because we just made (and ate) these insanely amazing Raspberry Chocolate cakes.  Either way, we are bursting with love over here.

mini raspberry chocolate cake recipe

As a mom of now two beautiful girls, we are finally finding our groove, even though its been a rocky few months as we all adjusted going from a family of three to a family of four.  With that, I have thoroughly enjoyed getting into the kitchen with our toddler more and more.  She loves helping me cook and bake and even though she may only be 3, I’m utterly always amazed at the amount of things she can solely do if I let her have at it.

valentines day mini chocolate cake recipe

Since Vday is right around the corner, I told her we could make some chocolate heart cakes since I had gotten a similar mold to this last year.  She woke up the next day and begged to get into the kitchen.  Andrew asked for chocolate cake and I thought of adding a raspberry sauce instead of frosting to make it a bit healthier.  The result was phenomenal.  So good in fact, Andrew suggested I make it again in 2 weeks for his dad’s birthday.  I know it was a hit then.  Skibbles downed an entire mini cake by herself and kept begging for more “red dip”.

mini chef mondays chocolate cake recipe

This will definitely be a recipe that we continue to make for lots and lots of future events.

0 from 0 votes
Print
Raspberry Chocolate Cake Recipe
Author: Larisha Campbell
Ingredients
  • 1 1/2 sticks unsalted butter softened (not melted!) + more
  • 1 cup sugar
  • 3/4 cup cacao powder unsweetened we use this kind
  • 3/4 cup all purpose flour
  • 1/2 tsp baking powder
  • 1/4 tsp salt
  • 3 eggs
  • 2 tsp vanilla
  • 1/2 cup plain Greek yogurt
For the raspberry sauce
  • 2 cups frozen raspberries
  • 1/8 cup sugar
  • 1 tbsp freshly squeezed lemon juice
Instructions
  1. Preheat oven to 350 degrees.
  2. Butter well a heart mold cake pan
  3. In a small bowl, combine flour, cacao, baking powder, and salt. Set aside.
  4. In a large mixing bowl, cream together butter and sugar until well combined.
  5. Add in eggs and combine.
  6. Add in vanilla and combine.
  7. Alternate adding in flour mixture and yogurt, starting and ending with the flour mixture.
  8. Pour batter into heart pan and fill 3/4 of the way full on each heart. Tap the pan to release any air bubbles.
  9. Bake for 20 minutes or until a toothpick comes out clean when inserted into the middle.
  10. Remove and top with raspberry sauce (recipe below), fudge sauce, whipped cream, chocolate shaving, or any other desired toppings.
For raspberry sauce
  1. Combine all ingredients into a pan over medium low heat. Cook, stirring often, for approximately 7-10 minutes or until raspberries are broken down.
  2. Strain through a mesh sieve to remove seeds.

If you don’t have a heart mold, you can pour the batter into a buttered round cake pan 3/4 of the way full and then use a knife to make it into a heart shape after it’s cooked.  It will take a bit longer to cook than recommended above.

Watch it being made:

mini chocolate cake recipe with raspberry sauce

I am hosting Mini Chef Mondays along with 11 fabulous bloggers!

Be sure to check out each of their Mini Chef posts as well. We would love it if you would share your Mini Chef posts with us each week, too! Follow along socially and join in on the fun by using our hashtag #MiniChefMondays to share creations your mini chef created in the kitchen. Additionally, if you have a kid-friendly recipe that kids can easily recreate link up! Don’t have a blog? Share the URL of your instagram photo in our linky below.

  1. Fresh Guacamole Recipe // Courtney’s Sweets
  2. The Best Vanilla Cupcake Recipe // Momma Lew
  3. Best Banana Crumb Muffins // Baby Loving Mama
  4. Raspberry Chocolate Cake Recipe // We’re Parents
  5. Sofia the First Cookies // Frugal Novice
  6. Alphabet Kids Snacks A is for Ant // Eating Richly
  7. Chocolate Banana Chia Pudding // Giggles, Gobbles and Gulps
  8. Kid-Friendly Chicken & Broccoli Quesadilla // Step Stool Chef
  9. Brussels Sprouts Chips // Vegging at the Shore
  10. How A 2 Year Old Can Help in the Kitchen // Mom’s Messy Miracles
  11. 5 Food Art Ideas for Kids // O’Boy! Organic
  12. Mini Pizza Tacos // Can’t Google Everything

An InLinkz Link-up


Filed Under: Desserts, Home, Kids In The Kitchen, Recipes Tagged With: cake, desserts, mini chef mondays, recipes


We're Parents is all about cooking and traveling our way through imperfect parenting. Learn More

SUBSCRIBE TO OUR WEEKLY NEWSLETTER & GET PARENT & ME COLORING SHEETS

Connect With Us

We're Parents is a unique mom and dad natural parenting blog focusing on topics such as breastfeeding, babywearing, and car seat safety. You'll also find Delicious recipes, inspired travel recommendations, and more as you journey with us through parenting. Learn More…

VIEW OUR PRIVACY POLICY

Even More Recent Posts

a black and white photo of a curly haired african american woman in a sweater holding a new born baby while standing up.

We’re Parents is a participant in the Amazon Services LLC Associates Program, an affiliate advertising program designed to provide a means for sites to earn advertising fees by advertising and linking to amazon.com

Copyright © 2026 · Foodie Pro Theme by Shay Bocks · Built on the Genesis Framework · Powered by WordPress

Rate This Recipe

Your vote:


A rating is required
A name is required
An email is required