We're Parents

  • Home
  • About Us
    • About Us
    • Privacy Policy
    • Contact Us
    • Disclosures
    • Media Kit
  • Parenting
    • Pregnancy and Postpartum
    • Breastfeeding
    • Car Seat Safety
    • Mental Health
    • Babies
    • Toddlers
    • School Age
    • Older Kids
    • Holiday Crafts & More
    • Green Living
  • Recipes
    • Breakfast
    • Lunches
    • Dinner
    • side dishes
    • Crockpot
    • Desserts
    • Lactation Recipes
    • Snacks
    • The Seasoned Kids (Recipes by Kids)
  • Travel
    • Kid Friendly Outings
    • Restaurants
    • Travel Tips

Santa HQ – A Family Experience

December 16, 2019 by Larisha Campbell Leave a Comment

Santa HQ is a fun and exciting immersive experience for the whole family to visit Santa Claus. Located at 15 malls throughout the US. Learn more by reading our experience.

Disclosure:  This Santa HQ post is sponsored by HGTV. Thoughts and opinions are 100% my own.

A few years ago, I didn’t even know if we were going to do Santa. Each year, I still question it in the back of my mind. I feel wrong to lie to them. However, the moments and memories that we’ve created around Santa have been completely worth it. 

Both girls eyes light up, their little voices glee with happiness, and their laughter brings everyone so much joy. I know in those moments that it’s so worth it.

For the last 4 years, we have been going to Santa HQ over at our local mall. The mall, located in Deptford, NJ, teamed up with HGTV to bring locals “Santa HQ“.

It’s a super fun and exciting holiday experience that the whole family will enjoy in addition to the traditional visit with Santa Claus. *Bonus: Santa in Deptford has a real beard 😉
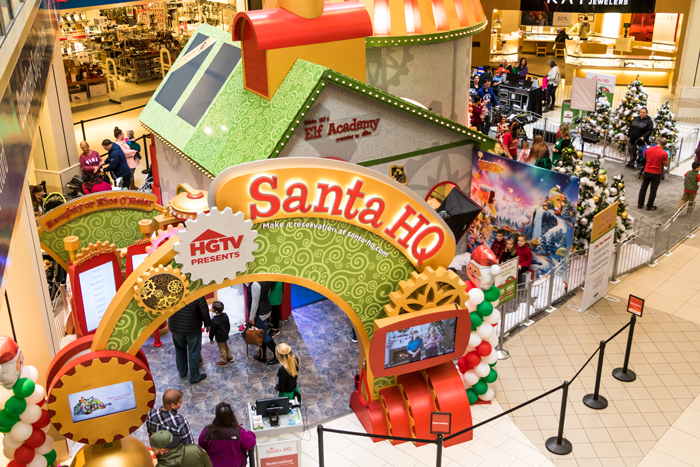
What is Santa HQ?

As soon as you walk into Santa HQ you are immersed in all things Christmas holidays. Santa HQ works by guiding visitors through an immersive, interactive holiday experience with the use of state-of-the-art digital technology.

You have to absorb everything and be careful not to miss anything, but HGTV has worked really hard to pack in as much of the holiday spirit as they can in this experience. The first thing that happens is you get checked in (it’s better to have reservations).

Then you have four stations:

  • Naughty or Nice Meter
  • Santa’s Workshop
  • Santa’s Observatory
  • Finally, Santa’s Sleigh (this is where the big guy is sitting)

Honestly, it’s just such a fun and unique way to enjoy Santa.  I know growing up as a kid, I loved going to see Santa. However, I never wanted to stand in the mall lines.  The Santa HQ experience not only is a fun way to get into the holiday spirit, but it’s also great for breaking up the line so parents aren’t waiting for an exorbitant amount of time. The elves (staff) and Santa are amazing with the kids and it’s truly just so great.

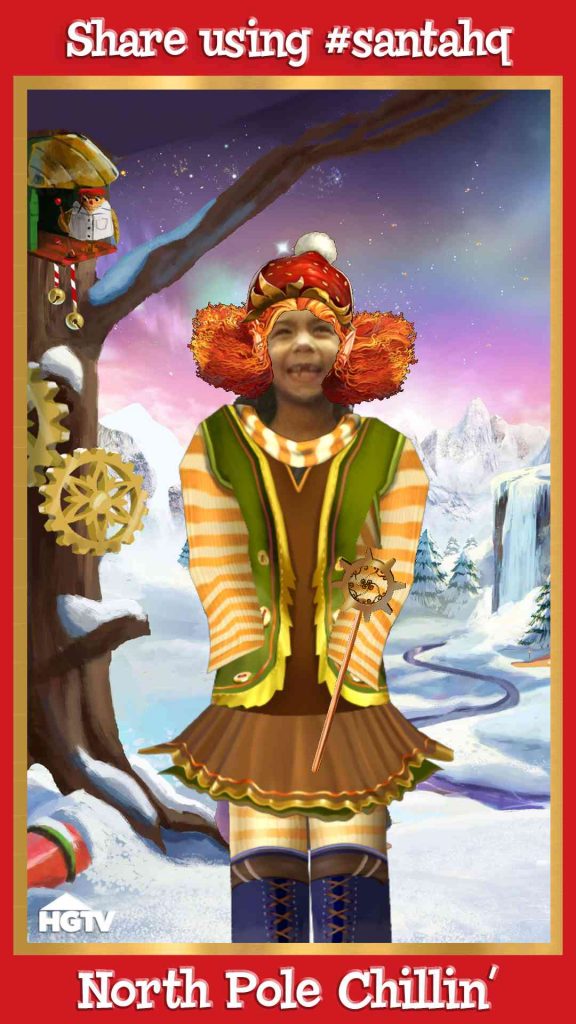
Plus, you have to see the innovative way that mobile apps, social-media-ready opportunities and augmented reality are woven into the Santa HQ experience. 

See a few sneak peaks: 

How much does it cost to do Santa HQ? 

The Santa HQ experience is completely free of charge to go through the set-up and even speak with Santa.  The only thing that you potentially have to pay for is photos and that is completely optional.  (They are super cute to look back on every year). 

Can I just walk in to Santa HQ or are reservations a must?

You can absolutely just walk in to Santa HQ. However, reservations to Santa HQ are preferred. Trust me, you want a reservation. Especially if the only time you can go is on a weekend, it can get quite crowded. 

After all, Santa HQ is completely free.  You only pay if you want to purchase pictures.  So, it can fill up pretty quickly. Reservations are easily made at Santa HQ.

Also, you can even pre-pay for your photo package. Santa HQ is currently at 15 shopping locations in California, New Jersey, Chicago, NYC, DC, and more. See if there’s a location near here by visiting the Santa HQ site.

The Santa HQ Experience 

After you check in with the concierge, you’ll head to meet your first elf. You’ll stand on the Naughty or Nice O’Meter and see if you’ve been naughty or nice (hint: it’s always nice!). The kids name will pop up onto the top of the list that shows they’ve been nice!

Next, they are invited to sit down at a holiday photo set-up at “The North Pole”. The elf taking the pictures stages your family to take some pretty adorably amazing photos at the North Pole before they head off to their next adventure.

Next, families are invited to visit Santa’s workshop where they will find Santa’s Elf Academy.

This year, each kid gets to make their own Elf ID card. 

They put their face inside a little oval and then you have the option to mail yourself the ID Card right from Santa’s workshop.  It’s fun to do this because of the end of the experience they get a set of Elf ID cards in the activity workbook from Santa HQ. Our girls loved having their own to go along with the “real ones” as they called them. 

There’s also a Magic Mirror that they can play with that allows for them to look like an elf and change outfits. 

Then it’s time for Santa’s Observatory.

Families head for a fun adventure to the Elf-Ray Vision Station where children use tablets to project elves working, Santa’s sleigh and more.

The tablets come alive and kids will be super intrigued at how it looks like nothing is on the wall but when you hold up the tablet, things are there.  It’s pretty nifty actually. 

Finally, it’s time to see the big jolly guy and families end the experience with the traditional Santa Claus photo-op.

Just like the shopping mall Santa experience when you were little, this is the best part.  You get to see and speak with Santa and afterwards you get a little activity book. 

Ready? If you want to spend less time in line, then you will want to purchase a Fast Pass today! Visit Deptford, NJ’s Santa HQ, to make reservations, grab your fast pass and pre-purchase a photo package. 

Book your Santa HQ Reservations Now!

Santa HQ in Deptford, NJ is open 9am-9pm and Christmas Eve 9am-6pm.

Don’t worry, if you didn’t snag a fast pass, there are still kiosks available for you to purchase photos that day too!

Here’s some photos from the last two years.  We love that it’s the same Santa Claus, so they can have a similar memory!

Holiday Giving with Santa HQ 

Also, when heading over to Santa HQ consider bringing a toy to donate.  Visitors at Santa HQ, in conjunction with HGTV’s Help Through Holiday Giving Drive, are encouraged to donate a new, unwrapped toy. Toys go to benefit local organizations like Toys for Tots, Salvation Army Angel Tree, Forgotten Angel Tree and more. However, this is not required.

Check Out Even More By Watching the Video Below:

Book your Santa HQ Reservations Now!

Filed Under: Home, Parenting, Travel Tagged With: christmas, holidays, santa

Christmas Gifts Your Kids Are Guaranteed To Play With

December 13, 2018 by Larisha Campbell Leave a Comment

While this post about Christmas Gifts Your Kids Are Guaranteed To Play With is satirical in nature, the truth is these are really things your kids would play with longer than anything you are likely to buy them. 

Trying to decide what gifts to get our kids for the holidays is such a toss up. Do we get them things that we think they want, they need, they asked for? Which one or combination of ones is the best choice? That seems to be a question that every single parent asks every single year.  You would think by now that we’ve figured it out. Wrong.

Do We Give Gifts We Think They Want?

The first option, gifts we THINK they want. In someways this option is in a way us reliving out our own childhood. Gifts that maybe we didn’t get because it cost our parents too much or our parents didn’t like the idea. Now that we are in control of the gift giving sometimes that comes into play a little. At least I know here is does.

Sure there’s the whole, I know what they will play with or I know they’ve been asking for XYZ for a few months now. But I think there’s definitely a small part of every parent that wants to (and sometimes does) get a gift that they themselves wished for when they were little in hopes that it really is a magical thing for their own kid. And partly because WE want to play with it and see how it is. 

Do We Give Gifts They Need?

The next option, things we KNOW they need, aren’t things that they actually want. Look, I know….budget. You are trying to optimize the number of presents they have to open while not spending a $100 on every box that they have to unwrap. However, opening up a huge pack of socks and/or underwear isn’t their idea of a good time. Neither is a new toothbrush or body wash in their stocking.

Yes, it sure does help our spending later in the year. But truly, this is an idea that we likely just need to toss to the wind.

Do We Give Gifts They Ask For?

And then there’s the gifts that they ask for themselves. Now, if you’ve been a parent for more than 3 minutes, then you know sometimes kids make demands that are unreasonable. Why no, love child of mine, you cannot have the motorized Lamborghini, Barbie’s Superdeduper Ultimate Deluxe dreamhouse, the biggest set of legos known to man, and all of the bikes and helmets you see in the store. Their asks are typically completely unreasonable. Though one year my oldest did ask for a vacuum and used it for 23 minutes before never touching it again another day in her life.

So what gifts do we actually get them?

Don’t worry. I have figured out the answer and it’s going to be the best set of gifts you have ever bought. I mean these are Christmas gifts your kids are guaranteed to play with for more than 2 minutes before moving onto something else. Now, before we get into the list let me preface this with my suggestion that these gifts are in the 1-8ish year old age range. I’d venture to say that some of these could be used for an older crowd also but it totally depends on the nature of your child(ren).

These gift ideas that I’m going to share with you will have you way under budget- like seriously way under budget. You can actually get that new [insert thing you’ve been wanting] and not even feel guilty about it because you’re so under budget. Also, you will actually now have more time alone to finish that plate of hot food that you never get to enjoy.  So you’re welcome.

Now, without further ado… Christmas Gifts Your Kids Are Guaranteed To Play With

  • Cardboard boxes

    • It’s the ultimate toy. Nothing else is really needed.  Grab a bunch of different sizes and let them have at it.
  • Toilet paper rolls

    • My kid’s actually fight over who gets the toilet paper or paper towel rolls when they are empty.
  • Laundry baskets

    • It’s rodeo heaven around here in a laundry basket.  How fast can you go? Hide underneath it. Make it into a crib.  Endless possibilities.
  • Empty plastic bottles

    • They will stuff things inside, empty it, and repeat for hours.
  • Sealable sandwich bags

    • See above.
  • Empty plastic or reusable bags

    • They swear they are going places and will use it as a purse, luggage, or storage container. Just let them have at it.
  • Clothes hangers

    • If you really want to see a kid’s imagination at work, hand them some hangers. It’s hilarious.
  • Unusable cellphone

    • They want to mimic you. It’s better if it can at least light up and allow them to move around a screen, but even if it doesn’t and is truly unusable, they will still play with it.
  • Pots and pots

    • It’s the oldest household item used by a kid.  If you dare, hand them a wooden spoon along with it.
  • Bag of beans or dry pasta

    • Paired with a plastic bottle and they will play for hours.

  • Sticks from outside

    • Have to be careful with these, but they do last forever in the fun zone.
  • Maxi Pads and Tampons

    • I am amazed at how long a kid will play with these.
  • Old High Heel Shoes 

    • Girl or boy doesn’t matter, they think it’s hilarious to try to walk in them.
  • Potatoes

    • They will turn it in a baby or a host of a million other things, but the point is they will play forever.
  • Pinecones

    • I think they are prickly but kids seem to love doing things with pinecones.
  • Roll of tape or bottle of glue

    • This is the height of kid fun.
  • Plastic Cups

    • I’ve seen some pretty crazy things happen with a few plastic cups and lots of fun. Give it a try.
  • Towels or Blankets

    • Forts, forts, forts. No other commentary needed.
  • Spoons or Whisks

    • Just another one of the weird household things kids will play with forever.
  • Tissue Box

    • Pull tissues out. Put them back in. Repeat. Wipe something up, make it a doll blanket, use the box for some random craft. Lots of fun to a kid.
  • Leaves

    • One day my kids brought in a pile of leaves and played with them for over an hour. My mind was blown.
  • Plastic Containers and Large Bowls

    • There’s a reason that they won’t leave your drawer of “Tupperware” alone, it’s amazing to them. They will stack, restack, and sort for endless amounts of time.

So which idea do you think you little one(s) would like the best? Happy shopping!

PIN this list of Christmas Gifts Your Kids Are Guaranteed To Play With for later: 

We hope you enjoyed this list of Christmas Gifts Your Kids Are Guaranteed To Play With! If you enjoyed it, please share it with a friend!

Filed Under: Home, Parenting Tagged With: holidays, parenting

Festive Caramel Apple Cinnamon Roll Wreath

December 11, 2018 by Larisha Campbell Leave a Comment

This Caramel Apple Cinnamon Roll Wreath is the perfect brunch or breakfast meal for the holidays! The perfect brunch show stopper! You will wow everyone with this easy cinnamon roll centerpiece. 

Affiliate Links contained in the post help us earn a commission. 

Warm, soft dough, layered with a caramel apple sauce is the most amazingly special cinnamon roll recipe we’ve made to date.  The kids gobbled up this cinnamon roll wreath (naturally) and begged for more.

When you top the caramel apple cinnamon roll wreath with a homemade caramel apple icing, you’re in for an out of this world experience.  We topped our caramel apple cinnamon roll wreath with cranberries, dried blueberries, nuts and powdered sugar too.

The inspiration for this new holiday tradition

Every year, on Christmas morning, my mom would pop open a can of cinnamon rolls and pop them into the oven. We all knew that she would get the middle one and then the rest were up for grabs.  I remember begging to lick the icing container of any last remnants that remained inside. It was pure bliss as a child.

Now, that my girls are older, I love making them cinnamon rolls too.  It’s actually an amazingly fun thing to make with them. We have them on special occasions or just because, but it’s always awhile in between. Their giddy laughter warms my heart when I tell them what we are making. They jump up and down, dance, and run around with excitement. They too love to lick the bowl of icing when I’m done pouring it on. Can you blame them?

For the holidays though, I wanted to do something extra special.  We decided we were going to make a wreath out of our cinnamon roll dough. We may have done a few more practices runs at this one….strictly for testing purposes only. *wink wink* 

This is now one of our family traditions and the girls absolutely love it. So do we.

What ingredients do you need to make a caramel apple cinnamon roll wreath?

A cinnamon roll wreath can be made very similarly to a regular cinnamon roll recipe; however, the difference in this recipe comes in when you add the caramel apple part. For the cinnamon roll wreath, the ingredients that you need are:

  • flour
  • sugar
  • salt
  • instant yeast
  • unsalted butter
  • water
  • whole milk
  • eggs

Those ingredients will make the dough of this caramel apple cinnamon roll wreath. The next part is the caramel apple filling and for that, the ingredients that you will need are:

  • apple cider
  • brown sugar
  • maple syrup
  • heavy cream
  • unsalted butter
  • vanilla
  • salt
  • nutmeg
  • apple pie spice

If you want to make a cinnamon roll wreath with the caramel apple filling, but just a traditional cinnamon roll wreath, you would just need cinnamon and brown sugar.  We’ll explain below.

Lastly, there’s a delicious caramel apple icing that we add to the top of this. For the icing, you’ll need:

  • apple cider
  • cream cheese
  • powdered sugar
  • apple pie spice

How do you make a caramel apple cinnamon roll wreath?

In a bowl, you’ll start to make the dough. Add in the flour, sugar, salt, and yeast. You’ll add water and milk to a bowl of warmed, melted butter and pour that into the flour mixture.  Next, add in the eggs.  Then, knead with your hands until the dough is no longer sticky. Let it rise for just 15 minutes.

While the bread is rising, make the filling by combining the apple cider, brown sugar, maple syrup, heavy cream, unsalted butter, vanilla, salt, nutmeg, and some of the apple pie spice into a sauce pot. Let that cook over medium heat for 10 minutes, barely touching it. You are essentially making caramel sauce at this point and it’s best not to touch it. Remove, let cool.

Roll your risen dough out into a rectangle.  It should be about 30X20 in shape. Spread the cooled caramel apple sauce across the dough. Spread the remaining pie spice across the top. Roll up the dough into a log.

Essentially at this point you could turn them into cinnamon rolls by just cutting into even slices.

To make the cinnamon roll wreath, you’re going to make sure the seam side is down and slice lengthwise. Then, place the two pieces side by side with the filling side up. Starting at the top, fold one piece of dough over the other and braid the two strands until you reach the end. Pinching the ends together. Place on a greased baking sheet and form a circle. Cover and place in a warm preheated, but turned off oven. After 35 minutes, turn the oven on and cook for roughly 35 minutes.

Make the caramel apple icing while your cinnamon roll wreath cooks. Pour on top when you remove and let cool for a few.  Serves 16.

Can I make these into caramel apple cinnamon rolls instead of the a cinnamon roll wreath?

Absolutely! Whether you don’t feel like taking the extra steps or maybe a little intimidated by making a cinnamon roll wreath (seriously don’t be), there may be reason for you wanting just regular caramel apple cinnamon rolls instead.

You will make the recipe as directed until you end up with a rolled up log.  Instead of slicing the cinnamon roll log down the center, you will just cut into slices. You should be able to get 18 rolls out of the log that you roll.

Then you will proceed with the recipe as directed, but only bake the cinnamon rolls for 25-28 minutes. It’s super easy!

What other recipes could I serve for a holiday or Christmas brunch?

Obviously this recipe, makes for an absolutely amazing holiday brunch or breakfast centerpiece. It’s gorgeous, tastes amazing, and will completely wow people. However, you need more than this to serve! Other brunch or breakfast holiday recipe ideas are:

  • Pumpkin Cheesecake Pancakes
  • Twice Baked Sweet Potatoes with Sausage and Apples (Can be Vegetarian or Vegan too)
  • Cranberry Orange Nut Bread
  • Sweet Potato and Egg Muffins
  • Ham & Cheese Bites
  • Bacon Egg and Cheese Pretzel Bites
  • Banana Bread Pancakes with Caramelized Walnut Syrup

0 from 0 votes
Print
Festive Caramel Apple Cinnamon Roll Wreath
Prep Time
1 hr 5 mins
Cook Time
40 mins
Total Time
1 hr 45 mins
 
This Caramel Apple Cinnamon Roll Wreath is the perfect brunch or breakfast meal for the holidays! The perfect brunch show stopper! You will wow everyone with this easy cinnamon roll centerpiece. 
Course: Breakfast
Cuisine: American
Keyword: breakfast recipes, brunch, cinnamon rolls, holiday breakfast, holiday brunch, recipes
Servings: 16 slices
Calories: 400 kcal
Author: Larisha Campbell
Ingredients
For Cinnamon Roll Wreath
  • 5 1/2 cups all-purpose flour
  • 1/4 cup + 1 Tablespoon granulated sugar
  • 1 1/2 teaspoon salt
  • 2 packages instant yeast
  • 4 Tablespoons unsalted butter
  • 1 cup water
  • 1/2 cup whole milk
  • 2 large eggs
For caramel apple filling
  • 1/2 cup apple cider
  • 1 cup brown sugar
  • 2 tbsp maple syrup
  • 1 cup heavy cream
  • 1 stick unsalted butter
  • 1/2 tsp vanilla
  • 1/4 tsp salt
  • pinch nutmeg
  • 3/4 tsp apple pie spice + 1/4 tsp apple pie spice divided
For caramel apple icing
  • 2 cups apple cider reduced to 1/2 cup
  • 6 oz cream cheese softened
  • 1 cup powdered sugar
  • 1/4 tsp apple pie spice
Optional Toppings
  • Chopped pecan
  • chopped almonds
  • cranberries
  • dried blueberries
  • powdered sugar
Instructions
  1. Preheat the oven to 200 degrees.
  2. Grease a 14x16 pan with coconut oil and set aside,
  3. In a large bowl, add flour, sugar, salt, and yeast.
  4. Whisk to combine well.
  5. Set aside.
  6. In a small microwavable bowl, melt butter (about 30 seconds).
  7. Add in water and milk to butter bowl and heat for an additional 30 seconds.
  8. Carefully mix together so heated through.
  9. Pour the butter mixture into the flour mixture.
  10. Add the eggs and knead with hand until the dough is no longer sticky (do not overknead)
  11. Place in a bowl and cover with a tea towel for 20 minutes to rise. Make filling while dough rises. 

Make the Filling
  1. Add all the filling ingredients, reserving the additional 1/4 tsp apple pie spice for later, to a medium saucepan.

  2. Heat over medium for 10 minutes, only stirring 2-3 times max. This will bubble up a bit but that's fine.
  3. Remove from heat and let cool slightly.
Finish the Cinnamon Roll Wreath
  1. After dough has risen for 20 minutes, roll it out into the shape of a rectangle. This should be roughly 30x20 in size. Ensure that you don't have more dough in the middle than you do at the ends or your wreath will not be even.
  2. Spread the cooled caramel apple filling evenly across the rolled out dough. Work quickly so the filling doesn't harden.
  3. Evenly spread the remaining 1/4 tsp apple pie spice on top of the filling.
  4. Working from the longest side, tightly roll dough up. It's important that you get it as tight as possible.
  5. With the seam side down, cut the cinnamon roll in half length wise.
  6. Carefully place the two pieces side by side and place the right side over the left side.
  7. Continue to braid the two strands until you reach the end.
  8. Then carefully move the roll onto your greased baking sheet and form a circle, shaped like a wreath. 

  9. Cover lightly with aluminum foil.
  10. Turn the oven OFF and place the covered wreath into the oven for 35 minutes to let rise. 

  11. After the 35 minutes is up, turn the oven back ON to 375 degrees and remove the foil.
  12. Bake the caramel apple cinnamon roll wreath for 35-40 minutes or until the top is golden brown and the center is cooked all the way through. Note: if your oven brown faster and you notice golden brown around 25 minutes, place the foil back on top.
Caramel Apple Icing
  1. Add 2 cups of apple cider to a medium saucepan over medium high heat. Reduce down to 1/2 cup liquid. Remove from heat and let cool.
  2. In a medium bowl, beat together cream cheese and powdered sugar.
  3. Add in apple pie spice and reduced cider and blend until combined well.
  4. Place in fridge until ready for cinnamon roll wreath.
  5. Remove cinnamon roll wreath. If some of the filling has pooled into the middle, use a spoon and drizzle across the top of the wreath. Let cool.
  6. Top with caramel apple icing and optional toppings.
  7. Serves & Enjoy!

Recipe Notes

**Nutritional facts are just estimates. Please utilize your own brand nutritional values to double check against our estimates.  Nutritional labels to not include optional toppings, but does include icing.

Nutrition Facts
Festive Caramel Apple Cinnamon Roll Wreath
Amount Per Serving (1 slice)
Calories 400 Calories from Fat 117
% Daily Value*
Fat 13g20%
Saturated Fat 7g44%
Cholesterol 60mg20%
Sodium 313mg14%
Potassium 150mg4%
Carbohydrates 64g21%
Fiber 1g4%
Sugar 29g32%
Protein 6g12%
Vitamin A 490IU10%
Vitamin C 0.4mg0%
Calcium 56mg6%
Iron 2.3mg13%
* Percent Daily Values are based on a 2000 calorie diet.

This was truly one of our most favorite things that we have made on our site before and we hope that you truly enjoy it as much as we have. Happy Holidays from our family to yours!

Some items that may help you make this recipe:

PIN THIS CARAMEL APPLE CINNAMON ROLL WREATH FOR LATER: 

This post was originally published on 12/20/2017 and has since been updated.

Filed Under: Breakfast, Desserts, Home, Recipes Tagged With: breakfast, holidays, recipes

Halloween Safety Tips

October 11, 2018 by Larisha Campbell Leave a Comment

October is Halloween Safety Month. Unfortunately, Halloween is actually a very dangerous time for children. See how you can keep your littles ones safe with our Halloween Safety Tips. 

Affiliate Links Contained Within This Post.

Halloween is such a fun and exciting time. If you ask most kids, Halloween will be likely in their Top 3 holidays. I mean there’s a lot to love. Kids get to dress up like their favorite character from the past year. There’s candy, hayrides, haunted houses. Laughter. And so much more. What’s not to love?

Truth be told, as fun as it is for kids and parents alike, there is a lot not to love. Halloween Safety Month is all about alerting parents to the dangers that occur during Halloween season and how to keep your children safe.  Many of these Halloween safety tips should be discussed with your children all month long, but especially the week leading up to Halloween.  It’s also important to discuss Halloween safety at your children’s school or co-op if homeschooled, to ensure everyone is always safe.

Quick Halloween Safety Month Facts

  • 73% of children participate in Trick-or-Treating
  • Children are 2x more likely to be hit and killed by a motor vehicle on Halloween than any other day of the year
  • Only 18% of parents use reflective tape on their child’s costume
  • 3 out of 4 parents have Halloween safety concerns but only 1/3 speak to their children about Halloween safety tips

Halloween Trick-or-Treating Safety Tips

No matter your child’s age, these Halloween Trick-or-Treating Safety Tips apply to all families:

  • An adult should always accompany children under 13 during trick-or-treating
  • Carry a flashlight or strobe light
  • Only cross the street at corners, on crosswalks, or at traffic signals
  • Stay on the sidewalk as much as possible. If no sidewalk is available, walk facing traffic
  • Look left, right, and left again before crossing
  • Put down any devices and keep your head up at all times
  • Teach children to watch out for cars and to never dart into the street
  • Throw away any candy that’s not sealed in wrapper
  • Avoid homemade treats from strangers
  • Remind children how to dial 9-1-1

Halloween Safety Tips for Parents of Older Children

Thing change when you become a parent to an older child. They want to do things on their own and usually with friends.  Due to that, a unique set of Halloween Safety Tips for older children come into play:

  • Make sure they have at least one buddy, but preferably a group. Plan a route with them so you know where they will be, and make sure their cell phone is fully charged (if not, give them a back-up phone charger). Also make sure you agree on their time to be back home.
  • Tell them to never enter a stranger’s home or vehicle or accompany them to somewhere off your planned route
  • Ensure that they know to stay with their friends at all times
  • Explain to them why they should not eat any of their treats until they get back home
  • Go over distracted walking tips and how important it is for them to have their devices away during Halloween except for in emergency cases

Halloween Costume Safety Tips

Typically, parents ask their children what they want to dress up as, the child tells us, we buy the costume, and that’s the end of it.  There’s not a lot thought provoking discussions around Halloween costume safety. However, you do want to ensure that the costume you choose to buy or make doesn’t pose a safety hazard.  To do that you want to make sure:

  • Any masks don’t obstruct vision. If possible, opt for face paint instead.
  • If their costume is dark, ensure they can still be seen by motorists by adhering reflective tape to their costumes, buckets or bags. Another alternative would be to give them a flashlight, glow sticks, or strobe light.
  • Consider buying a reflective bag instead of a bucket
  • When using Halloween face paint or make-up, test for a skin reaction a few days prior to any event where you are dressing up
  • Make sure that any paint, make-up, dyes, or perfumes are washed off before bed to prevent irritations to the eyes or skin.
  • Pick the right size costume so children don’t trip and fall
  • Make sure accessories aren’t too sharp or long
  • Do not use decorative contact lenses. They can cause inflammation, infections, and eye disorders

Safety Tips for Drivers on Halloween 

If you plan to be driving during Halloween hours, you’ll want to follow these safety tips for drivers on Halloween:

  • Put down any electronics that will distract from driving carefully
  • Drive at a speed lower than posted
  • Watch out for children on roadways, especially in case they run across the street quickly
  • Be on the look out for children in dark colored costumes
  • Enter and exit driveways, neighborhood entrances, and side streets with caution
  • Be especially alert for children between 4:30pm and 10pm.

Safety Tips for Homes during Halloween 

Lots of decorating happens around your home to get in the Halloween spirit! Don’t miss these safety tips for your home during Halloween:

  • Opt to have children paint their pumpkins instead of carving themselves
  • If opting to carve, have an adult doing the carving
  • Instead of using candles, put glow sticks inside your carved pumpkins
  • Keep any props or decorations away from fireplaces or candles
  • Make sure if you are handing out treats, that your driveway/sidewalk are well lit and any shrubs or trees have been trimmed back
  • Remove any toys, hoses, or decorations that pose a tripping hazard

Safety Tips for Food Allergy Families during Halloween

Food Allergies present a unique situation when celebrating and partaking in Halloween activities. Make sure you have safety tips for food allergy families during Halloween:

  • Always food ingredient labels or look up the nutritional facts if the ingredients aren’t listed
  • Set aside any treats that may pose a risk to food allergies and consider doing a “switch witch” exchange
  • Be aware that sometimes miniature candies are produced on equipment that could pose a risk, even if the food allergy family member(s) has eaten a full size variety in the past
  • Teach children with food allergies to never share or take home-baked goods

Also on the note of food allergy families, even if you aren’t a family affected, you should make sure to have a few (or all) of your treats be food allergy friendly. There’s dozens of non-candy Halloween treat ideas available to help.

Hopefully these Halloween Safety Tips were valuable to you! 

Did we miss something?  Let us know in the comments below. 

PIN THIS HALLOWEEN SAFETY TIPS POST FOR LATER:

*Some Facts and tips come directly from the American Academy of Pediatrics and Safe Kids

Filed Under: Home, Parenting Tagged With: halloween, holidays, safety

Cranberry Cheesecake Cookies

November 24, 2017 by Larisha Campbell 2 Comments

My entire life, the Christmas season has been my most favorite time.  Growing up, it meant lots of time doing fun activities with my family, fun trips to see different lights, and of course presents.  Joyous is how I always feel this time of year. One of my favorite activities growing up was our annual Christmas Cookie day.  We would go to my oldest aunt’s house and spend the day making and decorating cookies.  It was always so much fun.

I love making unique cookies that are crowd pleasers. 

Today, we don’t have a ton of family around, but I do love carrying on this tradition with our girls.  I always try to work throughout the year to create one new recipe that we are going to create as our signature holiday cookie.  This is one that we take on Christmas to our family’s house that we attend for the holiday festivities.

Introducing Cranberry Cheesecake Cookies 

This year our signature cookie is going to be these cranberry cheesecake cookies.  They are phenomenal and a total game changer in the cookie field. We start with a delicious graham cracker dough with dried cranberries. Then, make a hole similar to thumbprint cookies. Next, fill with a cheesecake filling and bake! It’s super easy!

In the end, you have a sure hit thats going to please everyone! Check out our Cranberry Cheesecake cookies here:

0 from 0 votes
Print
Cranberry Cheesecake Cookies
Author: Larisha Campbell
Ingredients
Cookie dough
  • 1 1/4 cups finely crushed graham crackers about 9 crackers
  • 1 cup flour
  • 1 1/2 teaspoons baking powder
  • 1 stick unsalted butter softened
  • 1/2 cup packed brown sugar
  • 1 egg white save yolk for filling below
  • 1 tsp vanilla
  • 1/2 cup dried cranberries
Cheesecake Filling
  • 4 ounces cream cheese softened
  • 1/4 cup granulated sugar
  • Lemon zest from 1 large lemon
  • 1 teaspoon vanilla extract
  • 1 tsp lemon juice
  • 1 egg yolk
Instructions
  1. Preheat the oven to 350 degrees F.
  2. In a small bowl, stir together the graham cracker crumbs, flour and baking powder.
  3. In a large bowl, beat together the butter with the brown sugar.
  4. Add the egg white and vanilla and beat until well combined.
  5. Add to the graham cracker crumbs mixture and blend until just combined.
  6. Fold in cranberries.
  7. In a separate medium bowl, beat together the softened cream cheese with the granulated sugar, egg yolk, lemon zest, lemon juice, and vanilla until well combined. Set aside.
  8. Using a small scoop, scoop out the cookie dough and place on nonstick baking sheet.
  9. Using the back of a teaspoon, make an inverted dome in the center of each cookie.
  10. Spoon the cheesecake filling into the indents in the cookies.
  11. Bake for 12 minutes. The cheesecake should be just set and cookies starting to turn golden brown.
  12. Allow to cool a few minutes, then remove and cool completely on a wire rack.
  13. Serve or keep leftovers refrigerated.


Welcome to Houseful of Cookies

This year we are happy to have created this recipe for Houseful of Cookies.  It’s a fun link-up of some of my favorite bloggers (and a few I don’t know yet) all creating spectacular cookie ideas for the holiday season.  Some are traditional, while others, like our Cranberry Cheesecake Cookies, are a bit of grandma’s beaten path. All though, I’m sure, are deliciously amazing.  Here’s the recipes that these amazing creators have thought up for you!  Check them each out!

  • Houseful Of Nicholes – Slow As Molasses Cookies
  • A Crafty Spoonful – Chocolate Peanut Butter Crinkle Cookies
  • A Real Urban Mom – Chocolate Chip Cookies
  • Dash Of Evans – Cranberry Hootycreeks
  • Divas With A Purpose – White Chocolate Surprise Cookies in a Jar
  • Everyday Party Magazine – Simple Caramel Cream Sugar Cookies Swirls
  • Good Girl Gone Redneck – Perfect Holiday Saltine Toffee Treat
  • Happily Homegrown – Old Fashioned Hermit Bar Cookies
  • Honest & Truly! – Triple Chocolate Dipped Cookie
  • Hysterical Mom – Lemon Sugar Cookies
  • I am the Maven® – Moldy Mice Cookies
  • Keep Calm & Teach Fifth Grade – Winter Wonderland Sugar Cookies
  • Kenya Rae – Pecan White Chocolate Chip Cookies
  • Kiss My Tulle – Chunky Christmas Cookies
  • Mom On The Side – Hopscotch Crunchies Holiday Cookies
  • More Than Thursdays – Mint Surprise Sugar Cookies
  • Our Crafty Mom – Peanut Butter Chocolate Cookies
  • Peyton’s Momma – Chocolate Covered Christmas Trees            
  • Simplify Live Love – Double Chocolate Pomegranate Cookies
  • Teachable Mommy – 3 Ingredient Peanut Butter Cookies
  • The Analytical Mommy – Favorite Lactation Cookie Recipe
  • The Biswolds – White Chocolate Chip Toffee Cookies

Happy Holidays!!!

Filed Under: Desserts, Home, Recipes Tagged With: cookies, desserts, holidays

Carrot Cake with Maple Cashew Frosting

March 20, 2017 by Larisha Campbell Leave a Comment

One of my main goals, after just keeping the girls alive, is to get them to have an extremely versatile palate when it comes to food.  I want them growing up and constantly tasting new things, challenging their senses, and grow up loving all types of different things. This Carrot Cake with Maple Cashew Frosting was something that I would have never touched at their age. I wouldn’t have even touched it as a high school student. But yet, here we are, making this carrot cake together as a great brunch dessert for Easter, and my kid’s gobbled it up.

Think about it…growing up, you weren’t touching Aunt Sally’s carrot cake when you saw real carrots in the cake. Who’s eating that? I barely ate the vegetables on my plate, really only because I was forced too, yet here we are and you think You’re going to be able to get me to eat some?  You must have lost your mind. 

But seriously, a lot of us didn’t/don’t eat carrot cake.

I don’t actually recall the first time I did try a carrot cake, but I remember being like DOH. Why did I never have this before, it’s actually really good!

Our homemade version carrot cake from scratch is insanely easy to make and our girls loved licking the beaters clean. It was my favorite thing to do as a kid and I love sharing in their joy as they do it now (Andrew, however, thinks we are nuts because he was never allowed to do it growing up). The only downside is that I don’t get one for myself anymore.


The baby is really getting involved more in the kitchen and it’s absolutely adorable to see her excitement as she stirs and mixes things together. There’s no greater feeling than watching the joy on your child’s face. I love that she’s learning at such a young age also.

Tip Time!

The carrot cake recipe is super easy to make. We make it a bit healthier by subbing in applesauce instead of using oil, which does make for a denser cake.  If you aren’t a fan of that, definitely try making it with coconut oil instead.

Always fold in your carrots.  You don’t want these being mixed earlier because they will stick to the beaters and become super annoying. Trust me from experience. 

Always make your frosting ahead of time.  It takes awhile to make maple cashew frosting, as the cashews need to soak in water, so don’t wait!

One of my favorite cake tips to share is that as soon as your cake is cool enough to touch, but still very warm, take plastic wrap and wrap up the cake. Then put in the freezer until completely cooled.  This allows for all the steam to stay trapped inside the cake, allowing for a very moist cake.

The blend of homemade carrot cake mixed in with the maple cashew frosting is such an amazing combination.  We can’t wait to eat it again!

0 from 0 votes
Print
Carrot Cake with Maple Cashew Frosting
Author: Larisha Campbell
Ingredients
  • 1 cup sugar
  • 1 cup applesauce
  • 3 eggs
  • 1 tsp vanilla
  • 2 cups flour
  • 2 tsp cinnamon
  • 1/2 tsp baking soda
  • 1/2 tsp baking powder
  • 1/4 tsp salt
  • 2 1/2 cups shredded carrots
  • 1 cup finely chopped walnuts
Maple Cashew Frosting
  • 2 cup cashews
  • 1 tbsp + 1 tsp vanilla
  • 1/2 cup maple syrup
  • 1/4 tsp pink salt
  • 2 tsp cinnamon
  • 1/8 tsp cardamom
  • 1 tsp lemon juice
  • 2 tbsp coconut oil
  • nutmeg
Instructions
  1. Heat oven to 350 degrees.
  2. Grease bottom and sides of 13x9 pan with coconut oil.
  3. In a large bowl, mix sugar, applesauce, vanilla, and eggs for 30 seconds.
  4. Add flour, cinnamon, baking soda, baking powder, and salt.
  5. Beat for 1 minute.
  6. Fold in carrots and nuts.
  7. Pour into greased pan.
  8. Cook 30-40 minutes
  9. Cool for 10 minutes, remove from pan, cool completely.
Maple Cashew Frosting
  1. Soak cashews in water for 1 hour. Water should cover cashews.
  2. Strain cashews from water
  3. Add to food processor with maple syrup until smooth
  4. Stir in remaining ingredients.
  5. Spread on top of cooled cake.
  6. Sprinkle nutmeg on top of frosting.
  7. Serve!

ENJOY!

Here’s some things that could help you with your cake making!


NEED MORE IDEAS FOR EASTER!?  

HERE’S 25 EASTER RECIPES FOR THE ULTIMATE MENU! 

Filed Under: Desserts, Home, Recipes Tagged With: cake, desserts, Easter, holidays, homemade, recipes

Teaching Knife Skills + Banana Santa Snacks

December 2, 2016 by Larisha Campbell Leave a Comment

banana-santa-snack-idea

     The Seasoned Kids

Lesson 9: Teaching Knife Skills

Knife skills.  It’s the part of teaching kids cooking skills that make parents cringe. They always seem to go for the sharpest, biggest knife around. I’m hear to tell you that you can put all those sharp knives away because we have the perfect solution for you. Regardless of how you feel about your kid using a knife, it’s an integral part of teaching independence in the kitchen. Put your fears aside, read our tips, and get them chopping up everything.

knife-skills-kids-cooking-show

How to Start

To start, put the sharp knives away. Butter knives are the way to start by cutting small things. Kids can cut their sandwiches, cut bananas, or soft (warm not hot) potatoes. Unfortunately for your sanity, they will quickly want to move away from using a butter knife and they will want to use those sharp knives. But wait! There are kid friendly options in between using a butter knife and those sharp knives (see tips below). When moving on from butter knives, keep cutting to single slices before you move onto chopping skills. Once you get more comfortable, there’s nothing you can’t let them do!  Just continuously remind them of safety.

teaching-a-kid-to-cut-with-a-knife

Tips for teaching your kids knife skills

  • Use a learning tower to get them stable at the counter
    • Standing on a stool or sitting on the counter, doesn’t stabilize kids as much as a tower will
  • Ergonomically designed nylon knives, cutting gloves, and finger guards are options for in between the butter knife and sharp knife stages.
  • Teach them how to hold the knife with one hand, hold object with other hand, and slowly move the holding hand as you as cutting
  • You are more than likely to cut fingers with a dull knife rather than a sharp one so avoid giving them a dull knife
  • If you want to start teaching knife skills but this makes you nervous, use the nylon knives to cut clay or play-doh before working with food!

Recipe Time!

banana-santa-snacks

santa-banana-snacks

These Banana Santa Snacks are perfect for after school snacks or snacks for holiday playdates. Watch the video, then grab the full recipe below!

0 from 0 votes
Print
Teaching Knife Skills + Banana Santa Snacks
Servings: 2 banana santa snacks
Author: Larisha Campbell
Ingredients
  • 1 banana
  • 1 large marshmallow
  • 2 mini marshmallows
  • 2 fresh cranberries
  • 2 fresh strawberries
  • 4 chocolate chips
  • 4 chocolate sprinkles
  • coconut flakes
  • optional: 2 pretzel sticks
Instructions
  1. Peel banana.
  2. Cut it in half.
  3. Push cranberry into center of each banana piece.
  4. Add two chocolate chips for eyes and two sprinkles for eyebrows above the cranberry on each banana.
  5. Tear big marshmallow in half. Using a skewer or toothpick, push one half onto the top of the banana.
  6. Cut top of strawberries and add one strawberry, skinny side up, to the top of the marshmallow.
  7. Top with a mini marshmallow.
  8. Push on a small handful of coconut flakes for the beard.
  9. If desired, push a pretzel stick into the bottom of the bottom for a stick.
  10. Enjoy!

This post is a part of our “The Seasoned Kids”, kid’s cooking series. Learn more about The Seasoned Kids here.

Previous Lessons!

  • Week 1: Teaching Importance of Washing Fruits and Vegetables + Berry Parfait Recipe
  • Week 2: Learning to Stir + Cranberry Coconut Energy Bites
  • Week 3: 3 Ways to Mash + Overnight Oats Recipe 3 Ways
  • Week 4: Spreading + Peanut Butter and Jelly Spider Sandwiches
  • Week 5: Tearing + Bugs on a Log
  • Week 6: Pouring + Chocolate Peanut Butter Yogurt Popsicles
  • Week 7: Measuring & Weighing + Holiday Pudding Cups
  • Week 8: Sifting + Snowball Bites

logo-preview

PIN IT!!!!

  how-to-make-banana-santa-snacks

Filed Under: Home, Recipes Tagged With: christmas, holidays, kids snacks, snacks, the seasoned kids

Sifting + Snowball Bites

November 25, 2016 by Larisha Campbell Leave a Comment

snowball-bites-3163

     The Seasoned Kids

Lesson 8: Sifting

I have to admit, growing up one of my favorite things to do was to sift, sieve, or strain anything that I was allowed too. It’s such a fun activity as a child to watch. As our girl is getting older, we have been letting her do these things as well and she has the same excitement as I did. Watching things separate when straining is a great lesson for science activities with kids too!

How to Start

This lesson should definitely be reserved for a slightly older child simply because sifting = mess and straining typically involves pouring from heavier containers. Our Snowball Bites aka Peanut Butter Balls recipe below is definitely the perfect starting recipe.

snowball-bites-3204

Tips for teaching your kids to sift, sieve, or strain

  • Use a learning tower to get them stable at the counter
    • Standing on a stool or sitting on the counter, doesn’t stabilize kids as much as a tower will
  • Use large measuring cups to strain things instead of pots or crockpots that an adult would pour from
  • Use smaller strainers (like this) or larger sifters (like this or this) instead to help with small hands
  • In the beginning, only do cold or room temperature foods, no hot liquids. Flour or powdered sugar, while messier, are easier to start with.

Recipe Time!

snowball-bites-peanut-butter-balls

These Snowball Bites (also called Peanut Butter Balls to some) are perfect to get your kids involved in helping with seasonal cookie trays that you may be giving out. Let them help! Watch the video, then grab the full recipe below!

0 from 0 votes
Print
Sifting + Snowball Bites
Author: Larisha Campbell
Ingredients
  • 1/2 cup creamy peanut butter
  • 4 tbsp unsalted butter softened
  • 1/4 tsp vanilla
  • 1 1/2 cups powdered sugar + more for sifting
Instructions
  1. Mix the peanut butter and butter together.
  2. Add the vanilla and stir until combined.
  3. Add the powdered sugar and mix until no powder remains.
  4. Roll into balls. (*Tip: Should make 2 dozen 1 inch balls or you can make less, but larger ones)
  5. Roll balls in or sift powdered sugar over the balls.
  6. Let sit in fridge for an hour.
  7. Eat! Nom Nom!

snowball-bites-3179

This post is a part of our “The Seasoned Kids”, kid’s cooking series. Learn more about The Seasoned Kids here.

Previous Lessons!

  • Week 1: Teaching Importance of Washing Fruits and Vegetables + Berry Parfait Recipe
  • Week 2: Learning to Stir + Cranberry Coconut Energy Bites
  • Week 3: 3 Ways to Mash + Overnight Oats Recipe 3 Ways
  • Week 4: Spreading + Peanut Butter and Jelly Spider Sandwiches
  • Week 5: Tearing + Bugs on a Log
  • Week 6: Pouring + Chocolate Peanut Butter Yogurt Popsicles
  • Week 7: Measuring & Weighing + Holiday Pudding Cups

logo-preview

PIN IT!!!!

snowball-bites-aka-peanut-butter-balls

Filed Under: Home, Recipes Tagged With: christmas, holidays, recipes, snacks, the seasoned kids

DIY Twine Napkin Holder Centerpieces

November 15, 2016 by Larisha Campbell Leave a Comment

This shop has been compensated by Collective Bias, Inc. and its advertiser, Dr Pepper Snapple Group, Inc. and Georgia-Pacific LLC. All opinions are my own. #DrinkMakeWishBake #CollectiveBias

DIY Twine Napkin Holder Centerpieces

diy-holiday-tablescape-napkin-tutorial-2447

I remember growing up, every holiday we would head to my great-grandparent’s house.  It would be an hours long event every time with nothing really to do there for kids. When you hear about kids just going outside and playing for hours, that’s what we did. We weren’t allowed to watch TV because there was always a football game, car race, or their favorite talk show on at the time. It was a horrid talk show to a tween, FYI. And even if everyone (i.e., all the men) were asleep in front of the TV, we still weren’t allowed to change it.  So we would run around outside, explore all the oddities of an old house, like tiny hidden closets, and wait until the food was ready. Y’all know we weren’t allowed to be running through the kitchen!

Just thinking about the food brings back memories.  There was always a candy dish that was sitting on the corner of the counter and we would always try to sneak and grab a few pieces.  It was the only time we got chocolate milk. There wasn’t a get together without my great-grandma’s famous homemade potato chips. And it wasn’t even close to being a holiday celebration without the indulgent homemade ice cream and fudge sauce.

Fast forward to after dinner was over and the men went back in front of the TV, and all the women in the family helped clean up everything else. There were piles and piles of dishes to be done because everything was on the “nice china”. However, house was never left messy when everyone was gone.

Now, fast forward again to present time. We have our own house now.  Our great-grandparents have passed and we have started our own traditions with friends and family. One thing is certain. Don’t nobody have time to be toiling for hours over the sink after dinner is over. Even though, unlike my great-grandparents, we have dishwashers now, I need simple. I want to enjoy my company and the memories with them. Life is chaotic enough and for us the holidays are about joy, giving, and friendship.

holiday-tablescape-napkin-tutorial

That’s why this holiday season, I encourage you to stick with the basics.  You can still use paper plates and napkins and still have an amazing, simple tablescape that your guests will swoon over.

finished-holiday-tablescape-napkin-tutorial-2410

A few weeks ago, I decided I would have my closest friends and their families for a “Thanksmas” party. Thanksgiving and Christmas rolled into one and all taking place before any of the holidays actually hit. We all know it gets crazy with our own families so I wanted to make sure that we got together before it was too busy.  I knew I didn’t want to be standing, washing dishes all night after, or loading the dishwasher for the next three days, so I knew I was going to head to our local Target to grab Dixie Ultra® Holiday Plates and Vanity Fair® Impressions® napkins.  My other two stipulations was that I needed a “wow” factor and it had to be “simple, elegant, and budget-friendly”.

napkin-centerpiece-holiday-tablescape-napkin-tutorial-2398

Here’s our step-by-step tutorial on how to make these awesome DIY Twine Napkin Holder Centerpieces.

  1. Using an old toilet paper roll, mark off every inch. You will get four ring per every toilet paper holder.
  2. Cut along the line made in Step 1, keeping as straight at you can.
  3. Using a hot glue gun, place a line from edge to edge on shorted side around.
  4. Being careful of the hot glue guns, slowly wrap twine around under the entire toilet paper roll is covered.
  5. Once the entire piece is covered, add another dab of glue from the glue gun and seal the last bit of string to it.
  6. Using two Vanity Fair® Impressions® napkins stacked together (no one likes just one napkin!), start at one edge and diagonally roll towards opposite end.
  7. Using your twine napkin ring, place it over the  the folded napkins.
  8. Using shrubbery leaves (we clipped ours from our yard!), place some gently between the napkin ring and the napkins.
  9. Stick a cinnamon stick down between the napkin ring and the leaves.
  10. Repeat steps 1-9 until you have desired number of DIY Twine Napkin Holder Centerpieces.

how-to-make-a-twine-napkin-ring-diy diy-twine-napkin-ring-holderdiy-napkin-centerpiece

vanity-fair-holiday-tablescape-napkin-tutorial-2389

*To get the look we have here, layer Dixie Ultra® Holiday Plates in three different sizes on top of each other. Add the DIY Holiday Napkin Ring Centerpieces on top of the layered plates.

inspiring-holiday-tablescape-napkin-tutorial

We added in Canada Dry® Ginger Ale to the table in case our friends wanted to add a little fizz to the homemade fruit punch or sangria we made.

holiday-tablescape-napkin-tutorial-2438

By using Dixie Ultra® Holiday Plates and Vanity Fair® Impressions® napkins we were able to be more present in the moments that mattered the most to us during our “Thanksmas” party and the confidence that the products would hold up during performance.

dixie-vanity-fair-target

You can find Dixie Ultra® Holiday Plates in the Holiday seasonal section at Target or in-aisle with other disposable tableware items. Plus!  Check out these upcoming CartWheel Deals!

  •  25% OFF 7UP® Mini Cans and 20oz Bottles  November 15-26, 2016
  •  10% OFF A&W®, Sunkist®, Canada Dry® & more November 15-26, 2016
  • 10% OFF Mini Cans of 7UP®, A&W®, Sunkist®, Canada Dry® & more November 27 – December 24, 2016
  • 20% OFF Mini Cans of 7UP®, A&W®, Sunkist®, Canada Dry® & more December 25, 2106 – January 1, 2017

Pin to Pinterest!

diy-napkin-rings

Make sure to enter the sweepstakes fun by DPSG/Georgia Pacific below!

 
#DrinkMakeWishBake DPSG/Georgia Pacific Holiday Sweeps

Filed Under: Home Tagged With: centerpieces, diy, holidays, home

DIY Essential Oil Hostess Gift Basket

November 14, 2016 by Larisha Campbell 1 Comment

This shop has been compensated by Collective Bias, Inc. and its advertiser. All opinions are mine alone. #StimulateTheSenses #CollectiveBias

diy-essential-oils-hostess-gift-basket

While we having been exploring our own semi-crunchy journey for a little over four years now, we know that many people in our family still think we are a bit on the hippie wagon. Yet and still, I’m always looking for ways to get our family and friends on a more natural journey of their own.  One of the ways I love to do this is by introducing them to essential oils.  They are so versatile and amazing that it’s no wonder that people typically fall in love with them after just a few uses.

With the holiday season officially here, we came up with this awesome DIY Essential Oil Hostess Gift Basket. This is a super simple idea for any parties that you are going too where you want to bring over a gift for the hostess or hosting family.  You could even just do one of the projects if you have a smaller budget.

diy-essential-oil-hostess-gift-basket-idea

Inside our basket we included Nature’s Truth Essential Oils, a pair of fuzzy socks (who doesn’t love fuzzy socks!?), DIY Homemade Bath Bombs, DIY Homemade Room Spray, and DIY No-Sew Rice Heating Pack. Everyone always wants to make sure that their houses look and smell amazing for company, so we bust our butts cleaning every last detail and cooking food for 3x the amount of people we invited. While the get together goes off without a hitch and no one realized that you completely forgot to scrub an entire section of the baseboards in the kitchen, you melt into a puddle of exhaustion the second you close the door behind the last guest.  This type of exhaustion needs pampering and that’s exactly why this is the perfect hostess gift.

diy-room-spray-hostess-gift

Cinnamon Room Spray

  • 40 drops Nature’s Truth Cinnamon Essential Oil
  • 2 tbsp witch hazel (can use rubbing alcohol as an alternative)
  • water to fill bottle

**Directions: In a 4oz glass spray bottle, add the witch hazel and essential oils. Fill with water to top. Use as needed. Store in a cool area away from sunlight.

no-sew-rice-heating-pack

No Sew Heating Pack

  • 10 drops Nature’s Truth Peppermint Essential Oil (optional)
  • 1 lb white rice (uncooked)
  • 1 sock (ensure sock has no holes)
  • 2 pieces Thick yarn or thread, 10 inches each

**Directions: In a bowl, add the essential oil to the rice. Using a funnel, add the rice to the sock. On the open end of the sock, quadruple knot the thread to seal the hole. Then tie in a bow or snip the excess thread. Repeat on the close end of the sock. Heat in microwave 30 seconds at a time until desired temperature achieved.

**Optional: If not adding the essential oil to the rice, include a note with the gift that explains to recipient to add 2-3 drops on the outside of the sock with every use. 

how-to-make-bath-bombs-diy

DIY Lemon Bath Bombs

  • 1 cup baking soda
  • 1/2 cup citric acid
  • 1/2 cup Epsom salts
  • 1 tsp water
  • 2 tsp Nature’s Truth Lemon Essential Oil
  • 1 1/2 tbsp Nature’s Truth Almond Oil
  • 6 drops yellow food coloring

diy-bath-bombs

**Directions: In one bowl, mix the dry ingredients together in a bowl with a whisk until very well combined.  In a separate bowl, mix together the wet ingredients. Slowly combine wet ingredients into the dry ingredients. Note: if the mixture is foaming, you are adding too fast.  Keep whisking together until very well combined.  Using silicone baking molds, firmly pack mixture in each mold. Let air dry for a minimum of 4 hours or overnight.  Pop out and keep in an airtight container.

diy-bath-bombs-hostess-gift

Some other DIY projects you could think about making with Nature’s Truth Essential Oils to add to your hostess basket are: soaps, candles, dryer sheets, massage oil, and a mini diffuser.

You can find Nature’s Truth Essential Oils at Target.com

natures-truth-target

Or inside the vitamin aisle at the following stores (essential oils available vary by store): , CVS, Walgreens, HEB, Meijer, Albertsons, ShopRite, Rite Aid, and Stop & Shop.

natures-truth-walgreens

Filed Under: Essential Oils, Home Tagged With: christmas, essential oils, gifts, holidays


We're Parents is all about cooking and traveling our way through imperfect parenting. Learn More

SUBSCRIBE TO OUR WEEKLY NEWSLETTER & GET PARENT & ME COLORING SHEETS

Connect With Us

We're Parents is a unique mom and dad natural parenting blog focusing on topics such as breastfeeding, babywearing, and car seat safety. You'll also find Delicious recipes, inspired travel recommendations, and more as you journey with us through parenting. Learn More…

VIEW OUR PRIVACY POLICY

Even More Recent Posts

We’re Parents is a participant in the Amazon Services LLC Associates Program, an affiliate advertising program designed to provide a means for sites to earn advertising fees by advertising and linking to amazon.com

Copyright © 2022 · Foodie Pro Theme by Shay Bocks · Built on the Genesis Framework · Powered by WordPress