We're Parents

  • Home
  • About Us
    • About Us
    • Privacy Policy
    • Contact Us
    • Disclosures
    • Media Kit
  • Parenting
    • Pregnancy and Postpartum
    • Breastfeeding
    • Car Seat Safety
    • Mental Health
    • Babies
    • Toddlers
    • School Age
    • Older Kids
    • Holiday Crafts & More
    • Green Living
  • Recipes
    • Breakfast
    • Lunches
    • Dinner
    • side dishes
    • Crockpot
    • Desserts
    • Lactation Recipes
    • Snacks
    • The Seasoned Kids (Recipes by Kids)
  • Travel
    • Kid Friendly Outings
    • Restaurants
    • Travel Tips

Meatball Sliders

June 1, 2018 by Larisha Campbell Leave a Comment

This Meatball Sliders recipe is a huge hit with the kids and ready to go in under an hour! Try this delicious Meatball Sliders recipe today!

Disclosure: This post has been sponsored by Thrive Algae Oil. Thoughts and opinions are 100% my own.

At every get together growing up, my aunt would make these delicious homemade meatballs. It was one of the ways my mother could guarantee that I was going to get protein into my body on a busy day with family. They were amazing and it’s always one of the first recipes that I learned how to make. To this day, I still make them and I still love them.

But today, making them means something more. Today, the memories I hope to have with my beloved family recipe, is not my own, but rather, exciting memories of family favorite recipes into my own children. Luckily, I’ve succeeded with this recipe.  Both of our girls love these meatballs. So much so that they ask for seconds.

A New Spin on a Family Favorite

Meatballs are great by themselves (obviously) or put on top or rice or onto a roll. However, meatballs subs are hard for little kids to eat and putting on top of rice isn’t easy when you’re on the move (especially if you have to eat in the car). Today, we’re transforming our family favorite meatballs into a delicious and fun recipe for the whole family – Meatball Sliders! Not only are they a family friendly recipe, but it’s a crowd please and easy to eat on the run. Try them for your next get together or upcoming sports night!

How to Make Meatball Sliders

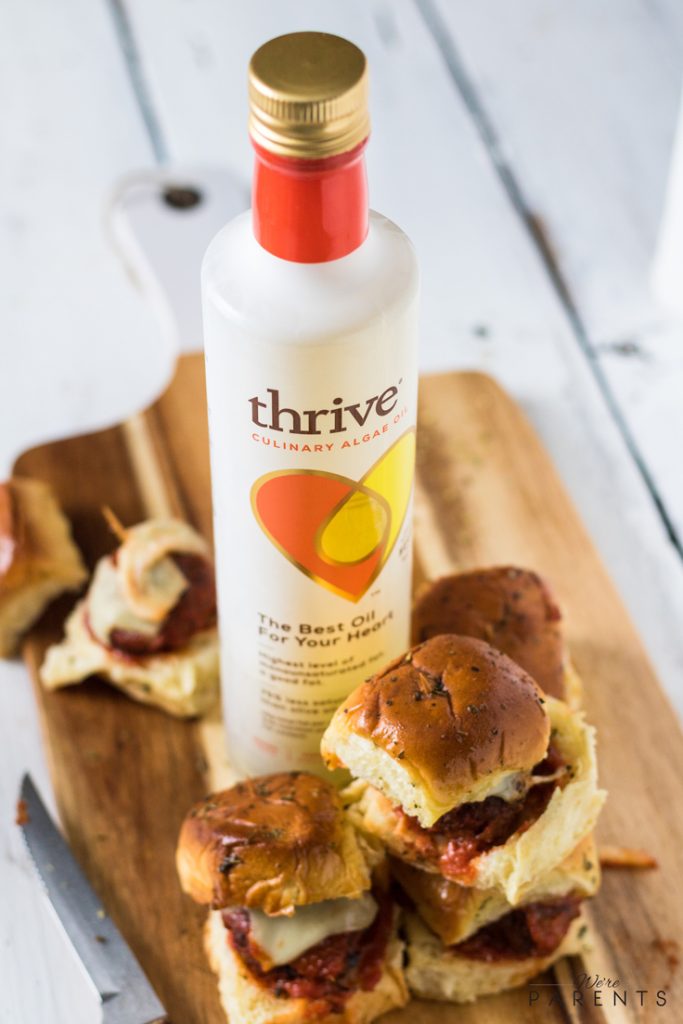
We start with the basics of our homemade meatball recipe. If you don’t have time, feel free to use large store bought meatballs. Once you form the ingredients into meatballs, then it’s time to get them cooking. We’ve opted to cook the meatballs in New! Thrive Algae Oil. Once the meatballs are cooked, we add spaghetti sauce to the skillet and cook for a few more minutes. Once that sauce is well incorporated with the meatballs, we start making our meatball sliders. We layer mozzarella cheese on top of slider buns with a little more sauce and one meatball. Once layered, we brush an herbed butter mixture on top of the buns and then cook for 12 minutes.  Then done! Easy peasy, lemon squeezy!

What is Thrive Algae Oil?

I know you guys caught that little tidbit in how to make them and your first thought was what is Algae Oil!? Luckily, I’m here to tell you today! Thrive® Algae Oil is an everyday cooking oil that is made from algae and has the highest level of monounsaturated fat (the good fat!) compared to any other cooking oil available. Plus, it has the lowest level of saturated fats (the bad ones!). Swapping out sources of saturated fat for sources of monounsaturated fat, such as Thrive, helps maintain heart health. Additionally, it has a super high smoke point of up to 485 degrees, so you can really turn up the heat.  And lastly, taste. I know you’re all wondering about this. Thrive® Algae Oil actually is a very light, neutral oil, so the food really shines without taking on the taste of the oil.

5 from 1 vote
Print
Meatball Sliders
Prep Time
10 mins
Cook Time
30 mins
Total Time
40 mins
 
This Meatball Sliders recipe is a huge hit with the kids and ready to go in under an hour! Try this delicious Meatball Sliders recipe today!
Course: Lunch, Main Course
Cuisine: American, Italian
Servings: 18 sliders
Calories: 173 kcal
Author: Larisha Campbell
Ingredients
  • 1 homemade meatball recipe* (only the first 9 ingredients)
  • 2 tbsp Thrive Algae Oil
  • 1.5 cups spaghetti sauce
  • 18 slider buns
  • 9 slices mozzarella cheese
  • 1/4 cup unsalted butter, melted
  • 1 tsp italian seasoning
Instructions
  1. Prepare homemade meatballs according to instructions. 

  2. Heat oil in skillet over medium heat.

  3. Preheat oven to 350 degrees. 

  4. In batches, cook meatballs, making sure not to overcrowd, for 10-12 minutes or until browned on all sides and cooked through. Stir frequently so not to burn. *Add more Thrive Algae Oil between batches if necessary.

  5. Once all the meatballs are cooked, add them back into the skillet with spaghetti sauce. 

  6. Cook for 3-5 more minutes. Then, remove from heat. 

  7. On your slider buns, place a quarter slice of cheese on the bottom, then a little bit of sauce from your skillet, one meatball, a little more sauce, another quarter slice of cheese and the top of the bun. *Use toothpicks to hold together if not staying together.

  8. Place on baking sheet and Repeat with remaining sliders. 

  9. Mix together the melted butter and Italian seasoning and brush mixture across the tops of meatball sliders

  10. Bake for 12-15 minutes or until golden brown on top.

  11. Serve

Recipe Notes

*Homemade meatball recipe can be swapped out for store bought meatballs. Look for meatballs at least 2" in diameter. Prepare according to directions.

**Nutritional facts are just estimates. Please utilize your own brand nutritional values to double check against our estimates. 

Nutrition Facts
Meatball Sliders
Amount Per Serving (1 slider)
Calories 173 Calories from Fat 72
% Daily Value*
Fat 8g12%
Saturated Fat 3g19%
Monounsaturated Fat 1g
Cholesterol 18mg6%
Sodium 196mg9%
Potassium 80mg2%
Carbohydrates 17g6%
Fiber 1g4%
Sugar 3g3%
Protein 6g12%
Vitamin A 265IU5%
Vitamin C 1.4mg2%
Calcium 101mg10%
Iron 1.2mg7%
* Percent Daily Values are based on a 2000 calorie diet.

Try Thrive® Algae Oil for yourself!  If you are in an ACME market, today, Friday, June 1-June 4 2018 you can try it at an in-store tasting throughout New Jersey and the greater Philadelphia area. Exact dates vary by locations, so contact your local ACME for more information on tastings local to you!

For more information, you can visit Thrive’s website, or check them out on Facebook, Instagram, Twitter, or YouTube!


Filed Under: Dinner, Home, Recipes Tagged With: dinner, lunch, recipes

Ultimate Pulled Pork Grilled Cheese

May 11, 2018 by Larisha Campbell Leave a Comment

This Ultimate Pulled Pork Grilled Cheese sandwich recipe is the perfect lunch or dinner sandwich for the whole family! Stack it super high or make a smaller version for the best grilled cheese recipe!

I can’t really pinpoint an exact time that I fell in love with pulled pork, but as a mom, it’s one of my favorite meals.  We alternate between pulled pork and pulled chicken, so feel free to substitute either of these meats in this recipe. We make a slow cooker pulled pork recipe with our homemade BBQ sauce which is one reason I love it so much.

My time as a mom, is limited. Even as a stay-at-home mom, I work from home and I homeschool, so we have a lot going on every day.  I’m constantly on the go and making lists and being able to throw dinner in the crockpot in the morning in under 10 minutes and have it ready at dinner, is a HUGE win for me.

Making a Gourmet Pulled Pork Grilled Cheese

Our gourmet pulled pork grilled cheese sandwich has a large combination of toppings. Think of this as a recipe that you would see served at a fun restaurant. Together, this sandwich works magically together. However, we understand that this may be unrealistic or to large for most people (especially littles).  Feel free to alter it however you need.

What toppings go on an ultimate pulled pork grilled cheese: 

  • pulled pork
  • mac and cheese
  • onion rings
  • bacon
  • ham
  • pineapple
  • lettuce
  • smoked gouda slices
  • cream cheese

Clearly, once you start piling these toppings on, you have a giant sandwich. It’s fun to eat though! You can make homemade pulled pork by following our homemade pulled chicken recipe and just sub the chicken for the same amount of pork tenderloin. Use your favorite mac and cheese recipe and then layer everything else between two slices of cooked, garlic texas toast. After that, throw in a skillet with a pat of melted butter and grilled until golden brown on both sides! Voila! Perfect pulled pork grilled cheese sandwich!

Best Side Dishes for Pulled Pork

  • Homemade French Fries (Try dipping them in our Honey Mustard BBQ Sauce)
  • Easy Coleslaw 
  • Southern Style Potato Salad
  • Macaroni Salad
  • Slow Cooker Baked Beans
  • BBQ Pasta Salad with Tuna
0 from 0 votes
Print
Pulled Pork Grilled Cheese
Prep Time
5 mins
Cook Time
5 mins
Total Time
10 mins
 

This Ultimate Pulled Pork Grilled Cheese sandwich recipe is the perfect lunch or dinner sandwich for the whole family! Stack it super high or make a smaller version for the best grilled cheese recipe!

Course: Lunch, Main Course
Cuisine: American
Servings: 4 sandwiches
Calories: 1162 kcal
Author: Larisha Campbell
Ingredients
  • 8 slices texas toast, cooked
  • 2 cups pulled pork, cooked
  • 8 onion rings, cooked
  • 1 cup mac and cheese, cooked
  • 4 slices bacon, cooked
  • 8 slices ham, thinly sliced
  • 4 slices fresh pineapple
  • 1/4 cup spring mix lettuce
  • 8 slices smoked gouda cheese
  • 2 oz cream cheese
  • 2 tbsp unsalted butter
  • Homemade BBQ Sauce, optional
Instructions
  1. On one slice of texas toast layer 1/2 cup pulled pork, 2 onion rings, 1/4 cup mac and cheese, 1 slice bacon, broken in half, 2 slices ham, 1 slice pineapple, 1/4 of the lettuce, 2 slices of smoked gouda, 1/4 oz of cream cheese. Top with another slice of texas toast. 

  2. In a skillet, over medium heat, melt 1/2 tbsp of butter. 

  3. Place sandwich in melted butter for 1-2 minutes or until golden brown. 

  4. Carefully flip and cook for another 1-2 minutes. 

  5. Remove from heat and repeat with remaining sandwiches.

Recipe Notes

**Nutritional facts are just estimates. Please utilize your own brand nutritional values to double check against our estimates. 

Nutrition Facts
Pulled Pork Grilled Cheese
Amount Per Serving (1 sandwich)
Calories 1162 Calories from Fat 630
% Daily Value*
Fat 70g108%
Saturated Fat 29g181%
Cholesterol 201mg67%
Sodium 2218mg96%
Potassium 808mg23%
Carbohydrates 71g24%
Fiber 3g13%
Sugar 14g16%
Protein 63g126%
Vitamin A 755IU15%
Vitamin C 40.2mg49%
Calcium 531mg53%
Iron 14.7mg82%
* Percent Daily Values are based on a 2000 calorie diet.

Pin this Pulled Pork Grilled Cheese for Later!   

Filed Under: Dinner, Home, Recipes Tagged With: bbq sauce, dinner, grilled cheese, lunch, pork, recipes, sandwiches

Monte Cristo Grilled Cheese Sandwich

May 10, 2018 by Larisha Campbell Leave a Comment

Our Monte Cristo Grilled Cheese Sandwich is a fun play on a traditional french Monte Cristo recipe. Try this delicious monte cristo sandwich and tell us if it’s not one of the best grilled cheese sandwiches you’ve had.  

The first time I ever saw a Monte Cristo sandwich, I was with my sister. We were at a restaurant together when she ordered one and when it came out, I was confused. There was meat and cheese on her sandwich but it was topped with powdered sugar and she told me the sauce was raspberry. After the disgusted look on my face, she made me try it anyway. It was in that moment that I learned the amazingness that is a monte cristo sandwich.

I knew when we were creating our grilled cheese sandwich series that a monte cristo grilled cheese sandwich had to be one of them. It’s such a fun recipe for the entire family. The kids think it’s amazing that we give them powdered sugar on a sandwich. I think the first time we made them, the girls lost we had gone off our rockers.

What is a Monte Cristo Sandwich?

Before we get into our monte cristo grilled cheese sandwich, let’s first discuss what is a monte cristo sandwich. A classic Monte cristo recipe is a fried ham and cheese sandwich.  It was a play on the French croque-monsieur which is a baked ham and cheese sandwich. Some people now use other meats in addition to the ham and it may or may not be fried.  It’s topped with powdered sugar and served with a raspberry sauce.

What sides do you serve with a Monte Cristo Grilled Cheese sandwich?

  • Homemade French Fries (Try dipping them in our Honey Mustard BBQ Sauce)
  • Easy Coleslaw
  • Cheesy Broccoli and Rice Casserole 
  • Corn on the Cob
  • Broccoli Tater Tots
  • Seasoned Rice
  • 4 cheese mac and cheese

How to make a Monte Cristo Grilled Cheese sandwich?

5 from 1 vote
Print
Monte Cristo Grilled Cheese Sandwich
Prep Time
5 mins
Cook Time
7 mins
Total Time
12 mins
 

Our Monte Cristo Grilled Cheese Sandwich is a fun play on a traditional french Monte Cristo recipe. Try this delicious monte cristo sandwich and tell us if it's not one of the best grilled cheese sandwiches you've had.  

Course: Lunch, Main Course
Cuisine: American, French
Servings: 4 sandwiches
Calories: 901 kcal
Author: Larisha Campbell
Ingredients
  • 2 tbsp unsalted butter, softened
  • 8 slices french toast brioche bread
  • 8 slices Smoked Gouda Cheese
  • 4 slices Swiss Cheese
  • 1 lb smoked ham slices (deli meat)
  • 1/2 lb smoked turkey slices (deli meat)
  • 1 pint fresh raspberries, optional
  • raspberry sauce, optional
  • powdered sugar, optional
Instructions
  1. Using previously cooked french toast bread, butter one side of each of the pieces. 

  2. Heat skillet to medium low. 

  3. Place one slice of bread, butter side down into the pan. 

  4. Layer 2 slices of gouda, 1 slice of Swiss, 1/4 lb of ham and 1/8 lb of turkey slices between two pieces of bread.  Add optional fresh raspberries in layers if desired. 

  5. Place another slice of bread on the top, butter side up. 

  6. Cook for 2 minutes or until golden brown. Flip. 

  7. Cook for another 1-2 minutes or until that side is also golden brown. 

  8. Remove and repeat with remaining sandwiches. 

  9. Top with powdered sugar and serve with raspberry sauce if desired. 

Recipe Notes

**Nutritional facts are just estimates. Please utilize your own brand nutritional values to double check against our estimates. 

Nutrition Facts
Monte Cristo Grilled Cheese Sandwich
Amount Per Serving (1 sandwich)
Calories 901 Calories from Fat 477
% Daily Value*
Fat 53g82%
Saturated Fat 30g188%
Cholesterol 312mg104%
Sodium 2288mg99%
Potassium 666mg19%
Carbohydrates 49g16%
Fiber 7g29%
Sugar 7g8%
Protein 59g118%
Vitamin A 1410IU28%
Vitamin C 31mg38%
Calcium 727mg73%
Iron 3.5mg19%
* Percent Daily Values are based on a 2000 calorie diet.

PIN THIS MONTE CRISTO GRILLED CHEESE SANDWICH FOR LATER!


Filed Under: Dinner, Home, Recipes Tagged With: dinner, grilled cheese, lunch, recipes, sandwiches

Philly Cheesesteak Grilled Cheese Sandwich

May 9, 2018 by Larisha Campbell Leave a Comment

Combine the best of Philly into one ultimate sandwich! A Philly Cheesesteak and a Philly Soft Pretzel collide to create the best Philly cheesesteak recipe – the Philly Cheesesteak Grilled Cheese Sandwich!

Growing up, we had cheesesteaks occasionally.  My dad would pull out these frozen sheets of meats and quickly whip them up until something delicious came of it. Or so I thought at the time. I always thought they were yummy, but I never got the hype of “The Philly Cheesesteak”. I mean…Don’t get me wrong, they’re good, but not something that you have to be known for if you’re one of the biggest cities in the country.

Then…I  moved…

A few years ago, Andrew and I moved to New Jersey. Well, he moved back, I moved here for the first time. One of the first places we explored together was South Street in Philly. He took me to Jim’s and it wasn’t until that moment that I got the hype. What I had grown up used to as a Philly Cheesesteak was NOTHING in comparison to the real thing.

Philly Cheesesteak sandwiches are now a favorite in our home, not only for Andrew and I, but for our children as well. We knew when we were discussing our grilled cheese sandwich series that we had to do a spin on a Philly Cheesesteak. In our opinion, this may be the best Philly cheesesteak recipe that you can make at home. It’s such a fun spin on a family favorite! The entire family will love this Philly Cheesesteak Grilled Cheese sandwich.

What are the ingredients on a Philly Cheesesteak Grilled Cheese?

We wanted to combine two Philly favorites – the Philly Cheesesteak and the Philly Pretzel to create this insanely delicious Philly Cheesesteak Grilled Cheese sandwich. We use a pretzel hot dog bun that we found at our local Amish market for the bun. It resembles a traditional cheesesteak bun, with the same delicious taste of a Philly pretzel. If you can’t find buns locally to you, then you can create your own pretzel buns at home or slice a soft pretzel in half for a close alternative.

Then, we seared up onions and ribeye steak in the traditional Philly way, added grilled red, green, and yellow peppers, and finally used both provolone and American cheese.  We skipped the whiz, but if you are a whiz traditionalist, feel free to add it to your Philly Cheesesteak Grilled Cheese sandwich!

What are good sides dishes for Philly Cheesesteaks?

  • Homemade French Fries (Try dipping them in our Honey Mustard BBQ Sauce)
  • Coleslaw
  • Beer Battered Onion Rings
  • Potato Salad with Bacon
  • Four Cheese Mac & Cheese

0 from 0 votes
Print
Philly Cheesesteak Grilled Cheese Sandwich
Prep Time
10 mins
Cook Time
25 mins
Total Time
35 mins
 

Combine the best of Philly into one ultimate sandwich! A Philly Cheesesteak and a Philly Soft Pretzel collide to create the best Philly cheesesteak recipe - the Philly Cheesesteak Grilled Cheese Sandwich!

Course: Lunch, Main Course, Snack
Cuisine: American
Servings: 4 people
Calories: 650 kcal
Author: Larisha Campbell
Ingredients
  • 1 lb ribeye steak, thinly sliced
  • 2 tbsp olive oil, divided
  • 1 medium onion, thinly sliced
  • 1/2 green pepper, thinly sliced
  • 1/2 red pepper, thinly sliced
  • 1/2 yellow pepper, thinly sliced
  • 1 tsp garlic powder
  • 1/2 tsp black pepper
  • 1/4 tsp smoked paprika
  • 8 slices sharp cheddar cheese
  • 4 slices Provolone cheese
  • 4 tbsp unsalted butter, softened
  • 4 pretzel buns (or other bun)
Instructions
  1. Season thinly slice ribeye with garlic powder, black pepper, and smoked paprika. 

  2. Heat 1 tbsp oil in a large skillet. 

  3. Add onions and peppers and saute for 3-5 minutes of until onions are translucent. 

  4. Remove from skillet and place on a plate. Set aside. 

  5. In the same skillet, head remaining oil. 

  6. Add the seasoned ribeye.

  7. Cook for 2-3 minutes, chopping up along the way. 

  8. Season with salt if desired. 

  9. Flip and Cook another 2-3 minutes or until steak is cooked through. 

  10. Add the onions and peppers back to the skillet and combine well. 

  11. Remove from heat. 

  12. Spread butter on inside of both sides of buns. 

  13. Place face down in skillet for approximately two minutes or until golden brown.

  14. Layer each sandwich with two slices of cheddar and one slice of Provolone, along with 1/4 of the meat mixture. 

  15. Repeat with remaining sandwiches. 

  16. Preheat oven to 300 degrees and bake sandwiches for 7-10 minutes or until cheese is melted. 

  17. Serve!

Recipe Notes

**Nutritional facts are just estimates. Please utilize your own brand nutritional values to double check against our estimates. 

*Top round steaks can be used in place of ribeye. Or if necessary you can use the frozen steak sheets in your grocery freezer section as a last resort. 

*Ask butcher to thinly slice your meat. 

Nutrition Facts
Philly Cheesesteak Grilled Cheese Sandwich
Amount Per Serving (1 sandwich)
Calories 650 Calories from Fat 441
% Daily Value*
Fat 49g75%
Saturated Fat 24g150%
Cholesterol 147mg49%
Sodium 674mg29%
Potassium 535mg15%
Carbohydrates 7g2%
Fiber 1g4%
Sugar 2g2%
Protein 44g88%
Vitamin A 1435IU29%
Vitamin C 60.3mg73%
Calcium 630mg63%
Iron 2.9mg16%
* Percent Daily Values are based on a 2000 calorie diet.

Pin this Philly Cheesesteak Grilled Cheese Recipe for later!

Filed Under: Dinner, Home, Recipes Tagged With: dinner, grilled cheese, lunch, recipes, sandwiches

Ultimate Grilled Peanut Butter and Jelly

April 3, 2018 by Larisha Campbell Leave a Comment

The ultimate grilled peanut butter and jelly sandwich will blow your mind.  Combining the traditional peanut butter and jelly sandwich with grilled cheese using perfectly melting gouda cheese and adding in bacon for the ultimate decadent peanut butter and jelly sandwich. 

grilled peanut butter and jelly

Sandwiches were a huge part of my childhood. They were really basic though. Grilled cheese. Peanut butter and jelly sandwich. Ham and cheese.  You get it. Basic. As I grew up, and explored more in the kitchen, I decided to get more creative.  I used to creative these really random things that somehow just always went together.  One was a grilled cheese peanut butter and jelly sandwich.

peanut butter and jelly sandwich ideas

I know what you’re thinking. Peanut Butter and jelly sandwich with cheese doesn’t go together. But what’s the old saying, “Don’t knock it til you try it!” If you’ve never tried a grilled cheese peanut butter and jelly sandwich then you must. But wait. It gets better. Grilled Peanut Butter and Jelly Sandwich with cheese ANDDDD bacon. I promise it’s delicious.  Plus, it’s a great alternative to making your kids the same thing over and over again.

grilled cheese peanut butter and jelly

Does Peanut Butter and Cheese Go Together?

Absolutely peanut butter and cheese go together.  I’ve found it best to use a honey roasted or honey added peanut butter.  My favorite cheese to use is gouda, however, a sharp cheddar or brie is great too depending on what kind of cheese you like.

grilled peanut butter and jelly sandwich

How do you make a Grilled Peanut Butter and Jelly?

Luckily, it’s insanely easy to make with grilled peanut butter and jelly sandwich with cheese and bacon. Take two slices of your desired bread. Spread peanut butter on one side and jelly on one side of second slice. Then, add sliced cheese and cooked bacon. Put two slices of bread together. Next, spread softened, unsalted butter on one outside side of the sandwich. Lay sandwich, butter side down, on a skillet over medium low heat. Now, butter the non-buttered side that is facing up.  When the bottom side gets golden brown, flip and cook for another 1-2 minutes until that side is also golden brown.  Serve immediately.

0 from 0 votes
Print
Grilled Peanut Butter and Jelly with Bacon
Prep Time
5 mins
Cook Time
5 mins
Total Time
10 mins
 

The ultimate grilled peanut butter and jelly sandwich will blow your mind.  Combining the traditional peanut butter and jelly sandwich with grilled cheese using perfectly melting gouda cheese and adding in bacon for the ultimate decadent peanut butter and jelly sandwich. 

Course: Lunch, Main Course, Snack
Cuisine: American
Servings: 1 sandwich
Calories: 844 kcal
Author: Larisha Campbell
Ingredients
  • 2 slice cinnamon raisin bread
  • 2 tbsp grape jam
  • 2 tbsp peanut butter
  • 1 slice cooked bacon broken in half
  • 1 slice gouda cheese
  • 2 tbsp unsalted butter softened
Instructions
  1. Take two slices of your desired bread. Spread peanut butter on one side and jelly on one side of second slice. 

  2. Then, add sliced cheese and cooked bacon. Put two slices of bread together. 

  3. Next, spread 1 tbsp butter on one outside side of the sandwich.

  4.  Lay sandwich, butter side down, on a skillet over medium low heat. 

  5. Use remaining butter and spread on the non-buttered side that is facing up. 

  6. Cook 2-3 minutes. 

  7. When the bottom side gets golden brown, flip and cook for another 1-2 minutes until that side is also golden brown. 

  8. Serve immediately. 

Nutrition Facts
Grilled Peanut Butter and Jelly with Bacon
Amount Per Serving (1 g)
Calories 844 Calories from Fat 522
% Daily Value*
Fat 58g89%
Saturated Fat 26g163%
Cholesterol 109mg36%
Sodium 734mg32%
Potassium 405mg12%
Carbohydrates 61g20%
Fiber 4g17%
Sugar 25g28%
Protein 22g44%
Vitamin A 880IU18%
Vitamin C 3.5mg4%
Calcium 258mg26%
Iron 2.3mg13%
* Percent Daily Values are based on a 2000 calorie diet.

Pin this Grilled Peanut Butter and Jelly sandwich with Bacon today! 

peanut butter and jelly grilled cheese with bacon

Filed Under: Dinner, Home, Recipes Tagged With: dinner, lunch, recipes, sandwiches

Hatfield Calzones

March 19, 2018 by Larisha Campbell 2 Comments

These Hatfield ham and sausage calzones are delicious homemade calzones perfect for any time of day! Endless possibilities with this calzone recipe!

Disclosure: This shop has been compensated by Collective Bias, Inc. and its advertiser. All opinions are mine alone. #HatfieldEaster #CollectiveBias

ham and sausage calzones

Growing up, pizza wasn’t really a staple in our home. Curry, jerk, exotic to Americans fruit…those were the staples.  We didn’t have sausage and ham often, and homemade pizzas never happened. Rarely, we maybe had pizza take-out. Growing up Jamaican, we didn’t have a lot of traditional American foods. When I went away to college at West Virginia University, I didn’t have anyone to cook for me.  American styled foods were the norm. Between dorm food and fast food, it’s pretty much all I had.

College is also where I tried my first calzone.  It was great because I could walk and eat it without worrying about toppings falling off.  When I met Larisha and she knew how to make these from scratch, I didn’t believe her. Then, she showed me and we’ve made endless varieties since then.

Homemade calzones are great for breakfast, lunch, dinner, after school snack, and quick dinners on the road! You get the point. There’s really not a time that a calzone wouldn’t be good ever.

how to make a calzone

What is a calzone?

A calzone is pizza dough that has been folded over and baked after ingredients have been put inside of it. Typically, it’s filled with meat and cheese. Sauce is always served on the side of calzones and never inside of it.

These particular ham and sausage calzones are combined with peppers, garlic powder, and cheese. The flavor impact from these few ingredients is insanely delicious. It makes for an amazing recipe after Easter if you have leftover ham!

We make our ham and sausage calzones with Hatfield Recipe Essentials Sweet Italian Ground Sausage and leftover Hatfield Original Ham. Hatfield Recipe Essentials are simple, flavorful, pork that add flavor to your dishes. The Hatfield brand character is high quality, trustworthy, knowledgeable, family oriented, American-owned, value-based company.

ham and sausage calzone recipes

How do you make a calzone?

If you are wondering how to make a calzone, you’ve come to the right place.  The first step is to make homemade pizza dough or grab some store bought.  Separate it into equal pieces and then rolls into a ball.  Once you have balls, you want to roll them out into approximately 6″ circles.  Note: calzones can be any size but 6″ is the perfect handheld size for on the go. It’s vital that your dough is even and not thin in any one place or you risk your dough breaking.

Then, places your ingredients on one side of your circle. Afterwards, fold the empty side over and using a fork, seal the edges together.  Next, brush with butter and bake in an oven for 20-25 minutes. Serve alongside sauce.

ham calzones after easter recipes

0 from 0 votes
Print
Hatfield Ham and Sausage Calzones
Prep Time
15 mins
Cook Time
25 mins
Total Time
40 mins
 

These ham and sausage calzones are delicious homemade calzones perfect for any time of day! Endless possibilities with this calzone recipe! 

Course: Lunch, Main Course
Cuisine: American, Italian
Servings: 8 calzones
Calories: 435 kcal
Author: Larisha Campbell
Ingredients
  • 1 pizza dough
  • 3/4 lb Hatfield Sweet Italian Ground Sausage, cooked
  • 3/4 lb Hatfield Original uncured ham, diced
  • 1 cup bell peppers, mixed colors
  • 1/2 tsp garlic powder
  • 1 tsp ground black pepper
  • 1 cup shredded pepper jack cheese
  • 1 cup shredded sharp cheddar cheese
  • 2 tbsp unsalted butter, melted
Instructions
  1. Preheat oven to 425 degrees. 

  2. In a bowl, combine sausage, ham, peppers, garlic powder, and pepper. 

  3. Separate pizza dough into 8 equal balls. 

  4. Roll out one ball into a 6" circle. 

  5. Place 1/8 of the mixture on one side of the circle. 

  6. Fold empty side over and using a fork seal the edges of the calzone. 

  7. Place on a baking sheet and repeat with remaining ingredients.

  8. Once all calzones have been made up, brush melted butter across all of them.

  9. Place in oven and cook for 20-25 minutes or until golden brown. 

  10. Remove from oven and let cool for 5 minutes before serving. 

  11. Serve alongside honey mustard bbq sauce.

Recipe Notes

Do not roll out more than one ball at a time or the dough will stick to the surface. Make one at a time.

Honey Mustard BBQ Sauce is not included in nutritional facts.

Nutrition Facts
Hatfield Ham and Sausage Calzones
Amount Per Serving (1 calzone)
Calories 435 Calories from Fat 234
% Daily Value*
Fat 26g40%
Saturated Fat 12g75%
Cholesterol 85mg28%
Sodium 1361mg59%
Potassium 290mg8%
Carbohydrates 25g8%
Fiber 1g4%
Sugar 4g4%
Protein 24g48%
Vitamin A 955IU19%
Vitamin C 24.1mg29%
Calcium 217mg22%
Iron 2.7mg15%
* Percent Daily Values are based on a 2000 calorie diet.

Hatfield Recipe Essentials come in the following varieties: Hot Italian Ground Sausage, Sweet Italian Ground Sausage, Ground Pork, Chorizo Ground Sausage and Country Ground Sausage, Tex-Mex Pork Strips and Simply Pork Strips. Grab them at your local store today!

hatfield recipe essentials

Pin these Ham and Sausage Calzones for later:

easy calzones recipe

Filed Under: Dinner, Home, Recipes, Uncategorized Tagged With: dinner, lunch, recipes

Chicken Quinoa Bowl

February 20, 2018 by Andrew 1 Comment

This Chicken Quinoa Bowl is a healthy alternative to rice bowls and a great, protein packed dinner option!

Disclosure: This Chicken Quinoa Bowl shop has been compensated by Collective Bias, Inc. and Mazola® Corn Oil. All opinions are mine alone. #SimpleSwap #CollectiveBias

chicken quinoa bowl

Since having kids, our life has been all “semicrunchyish”. It’s where we are working to make small changes one at a time to live a better and healthier life. This lifestyle is also teaching our children to make healthier choices from the start. One easy swap we made was to stop deep frying things and using butter so often. When cooking chicken like in this chicken quinoa bowl, we use an oil, like Mazola® Corn Oil, for grilling indoors. You only need a small amount. A clinical study showed Mazola Corn Oil reduces cholesterol 2x more than extra virgin olive oil. To learn more about this claim, see Mazola.com.

Another easy swap came a few years ago when Larisha told me she was making quinoa for dinner. Keen-What? She was all, “Don’t worry, it’s fine.” Whenever she says that, I know to worry. Dinner is usually going to end up being eggs or a smoothie because she’s experimenting and well, I don’t like experiments. Surprisingly, this “keen-wha” turned out delicious.

We’ve been eating quinoa for awhile now since then and we actually prefer it to other starches. It was one of the first changes that we made to living a less indulgent life and it’s completely stuck with us. What we’ve found works best is to make small changes and swaps one by one instead of drastic shifts. This helps to get used to things gradually instead of suddenly so much and it becoming overwhelming.

cooking healthier meals

How Long Does It Take To Cook Quinoa?

One of the reasons we love this chicken quinoa bowl we’re sharing with you today is because you can cook it fast. Traditionally, rice takes upwards of 40 minutes. However, quinoa can be ready in as little as 15 minutes. You always want to rinse quinoa to remove the coating. The coating can make quinoa taste soapy or sometimes bitter depending on your taste buds and no one wants that. Then, you have two options:

how to make a quinoa bowl

  1. Add 1 cup rinsed quinoa to 2 cups water. Bring to a boil. Cover and reduce heat to simmer. Then, let cook for 15-20 minutes (until no liquid is remaining).
  2. Our preferred method is to toast the quinoa and add some flavor. Using a bit of oil, like Mazola Corn Oil, sauté onions and garlic for 2 minutes. Add in the rinsed quinoa and stir constantly for 2 minutes. Then, add chicken broth. Bring to a boil. Cover and reduce heat to simmer. And let cook for 15-20 minutes (until no liquid is remaining).

easy chicken quinoa bowl

Chicken Quinoa Bowl

This recipe is a great way to make a better-for-you dish this New Year. Perfectly cooked quinoa is topped with chicken seasoned and grilled in corn oil. Paired alongside are black beans, your favorite fresh slaw recipe, corn salsa, avocado, and cilantro. To top it off, a few fresh squeezes of lime juice to have the absolutely perfect dish. Quinoa boosts higher dietary fiber and protein than white or brown rice making it healthier for you. Using a low-sodium chicken broth to cook the quinoa adds in flavor with the added salt content.   Additionally, cooking the chicken in a bit of corn oil versus butter or another fat and grilling instead of frying yields a healthier meal all around.

simple chicken quinoa bowl recipe

0 from 0 votes
Print
Chicken Quinoa Bowl
Author: Andrew
Ingredients
  • 2 tbsp Mazola® Corn Oil divided
  • 1/2 cup sweet onion chopped
  • 2 cloves garlic minced
  • 1 cup quinoa rinsed
  • 2 cups low-sodium chicken broth
  • 1 lb chicken breasts cubed or small slices
  • 1 tbsp chicken rub seasoning
  • Optional Toppings: corn salsa fresh slaw, avocado slices, black beans, chopped red pepper, chopped tomatoes, cilantro, lime wedges, corn vinaigrette or dressing
Instructions
  1. In a sauce pan, add 1 tbsp corn oil on medium heat.
  2. Add in the onion and garlic and saute for 2 minutes.
  3. Add in the rinsed quinoa and stir constantly to toast for 2 more minutes.
  4. Pour in chicken broth and bring to a boil.
  5. Add lid and reduce heat to simmer for 15-20 minutes until no cooking liquid remains.
  6. While quinoa is cooking, season cut chicken breasts with chicken rub seasoning.
  7. In a grill pan, heat remaining tbsp of corn oil on medium heat.
  8. Add chicken and cook for 8-10 minutes or until chicken has reached an internal temperature of 165.
To Assemble Your Chicken Quinoa Bowl
  1. First layer quinoa on the bottom of your bowl.
  2. Then, add your chicken.
  3. Next, add your desired toppings. In the photos shown, we used a fresh broccoli slaw, corn salsa, black beans, cilantro, avocado slices, and topped with lime juice and a sweet corn vinaigrette.

Mazola® Corn Oil can be found nationwide. It’s made of 100% pure oil with no additives. It’s also cholesterol free making it better-for-you. One of the best things about using a cooking oil is that its smoke point is 450°F. This mean that it’s great for high heat applications like stir-fry or sautéing. The 40 oz. bottle can be found in most major grocery stores, so head to your local store and grab a bottle today.

chicken quinoa bowl with mazola

Filed Under: Dinner, Home, Recipes Tagged With: chicken, dinner, lunch, recipes

Easy Alaska Salmon Burgers Recipe

January 16, 2018 by Larisha Campbell Leave a Comment

This Easy Salmon Burgers Recipe will have you feeling like it’s summer outside all year round.  Super simple and easy salmon recipe that’s sure to impress. 

This post was sponsored by Alaska Seafood as part of an Influencer Activation for Influence Central and all opinions expressed in my post are my own.

Salmon Burgers Recipe

We eat Alaska salmon weekly around here.  Admittedly, sometimes it’s been more than once a week.  We just love the lightness of salmon and the versatility of the meat to be transformed in so many ways. Plus, it’s recommended that the average Americans consumes 8 ounces of seafood per week. However, we typically tend to fall back on a handful of recipes, like our Honey Citrus Salmon.

It’s really important that you get Alaska salmon. Why? Because all Alaska salmon is wild-caught.  You want to make sure that you are not buying farmed salmon. Don’t worry, this isn’t difficult. We’ve found frozen Alaska salmon everywhere from Aldi to Target, but a quality fish market will have Alaska salmon too!

how to shred salmon

We’ve been wanting to switch up some dishes for the new year and what better way than to make it into a burger. Salmon Burgers are easy to make and not something to be fearful off.  If you successfully make other burgers, than you can make this too.

salmon burgers    alaska salmon recipes

How do you cook salmon burgers?

Just like any other burger, with salmon burgers you want to flavor the meat with a variety of seasonings, as well as eggs and breadcrumbs for your binding. This easy salmon burgers recipe has just 10 ingredients, so it’s super fast to make and combine together.

Once your mixture is combined, you separate into equal portion sizes.  These would be so fun as mini sliders too! Then you toss on the grill or a skillet on the stove and bake them for approximately 3-4 minutes on each side.  As with all fish, you are going to an internal temperature of 145 degrees.

salmon burger sauce

While this easy salmon burgers recipe is very easy to make, you do want to be mindful of cooking.  Exposing salmon burgers to unnecessary heat for an extended amount of time could cause the burger to actually be dry.  And no one likes a dry burger. 

how do you cook salmon burgers

What do you eat on a salmon burger?

It’s a burger! You top it with whatever you want! But in all seriousness, we went for really simple but impactful ingredient toppings for our salmon burgers.  Tomato, lettuce, and a cool lime sauce (recipe below). Truth moment: my kid asked for ketchup on it and I obliged b/c no one has time for arguing with a tiny dictator.  

what do you eat on a salmon burger

I’d also recommend red onions, mashed avocado, or cabbage. There are so many possibilities.

Pin it for later! Just hover over the Easy Salmon Burgers recipe image below and click Pin!

easy way to make salmon burgers

0 from 0 votes
Print
Easy Salmon Burgers Recipe
Author: Larisha Campbell
Ingredients
  • 1 lb Alaska salmon
  • 3/4 cup Panko crumbs
  • 1/2 cup red pepper finely chopped
  • 1/4 cup parmesan cheese
  • 1 egg slightly beaten
  • 1 tbsp lemon juice
  • 1/4 tsp red pepper flakes
  • * 1/2 tsp garlic powder
  • salt pepper to taste
  • 1 tbsp olive oil
  • 4 burger buns
  • Optional toppings: lettuce tomato, red onion, avocado, lime sauce (1/4 cup plain greek yogurt + 1 lime - recipe below)
Instructions
  1. Remove skin, if any, from salmon.
  2. Using two forks, shred the salmon apart into pieces.
  3. In a large bowl, add salmon pieces, panko crumbs, red pepper, parmesan cheese, egg, lemon juice, red pepper flakes, garlic powder, salt, and pepper.
  4. Combine really well.
  5. Separate the mixture into 4 equal parts and form into patty shape.
  6. Let patties sit for 10 minutes.
  7. Heat olive oil in a skillet over medium low heat.
  8. Depending on skillet size, add burgers all at once or in batches, making sure not to overcrowd burgers.
  9. Cook for 4 minutes on each side.
  10. Remove and add desired toppings to patties.
  11. For lime sauce - combine 1/4 cup plain greek yogurt with zest and juice of one lime. Stir until combined. Use immediately or store in air tight container for up to 3 days.

These products may help you with this recipe:


VISIT WWW.WILDALASKASEAFOOD.COM FOR EVEN MORE RECIPES! 

Then head out to the store and look for Alaska on your packaging!

where to find wild caught salmon

Visit Alaska Seafood Online:

  • Facebook: https://www.facebook.com/alaskaseafood
  • Twitter: https://twitter.com/Alaska_Seafood
  • Instagram: https://www.instagram.com/alaskaseafood/
  • Pinterest: https://www.pinterest.com/alaskaseafood/

Filed Under: Dinner, Home, Recipes Tagged With: dinner, lunch, recipes, salmon

Twice Baked Sweet Potatoes with Sausage and Apples (Vegan Option Included)

December 28, 2017 by Andrew 4 Comments

Delicious Twice Baked Sweet Potatoes with “Sausage” and Apples is a perfect option for lunch, dinner, or brunches!
Disclosure: This Twice Baked Sweet Potatoes with Sausage and Apples was originally sponsored by Morningstar Farms. 

twice baked sweet potatoes

I think for the first year ever, I actually met all my wellness goals this year.  Every year seems to be a struggle after the first month or two, but not this year.  This year, I actually did it.  It was a lot of work and maybe a little pouting. Larisha would probably say a lot of pouting. But, it all paid off.  I’m the healthiest I’ve ever been and it feels amazing.

How and Now What?

As we go into the New Year, it’s time to set new goals. I did two things differently this year that I think really adding to me keeping on track.

  1. I shifted my mindset.
    • Every time that I thought I wanted something bad to eat, I told myself I had to eat nuts or a fruit first.  If I couldn’t do that, I was just bored and needed to go do something else.
  2. I allowed myself a cheat day.
    • Every Saturday I was allowed to eat whatever I wanted. We typically ordered out or made a heavier meal that we didn’t have during the week.

These two little things greatly changed how I took on this year and lead me to the healthiest year I’ve ever had as an adult. Eating healthier versus an exercise focus really helped also. Now, for this year, I really want to focus on portion control and working towards a more plant-based diet. However, I’m not ready to give up that taste of meat in meals just yet.

Starting the Day off Right

Over the years of my journey to being healthier, I’ve consistently done one thing: ate breakfast. It starts your day off on the right foot and kickstarts your energy in the right direction.  On my journey now towards a more plant-based diet, I’ve found MorningStar Farms® Sausage, Egg & Cheese Breakfast Sandwiches. They are great for on the go and they are kid-approved too. It’s a simple swap that keeps me on the right track.

morning star farms products

Twice Baked Sweet Potatoes with Sausage and Apples

One thing that helps stay on track is meal planning and meal prepping.  With these Twice Baked Sweet Potatoes with Sausage and Apples, you can make them on the weekend and eat them over the next few days. I’ve swapped traditional sausage for MorningStar Farms® Original Sausage Patties and loaded in more fruits and vegetables. Bonus: It’s vegan and vegetarian friendly!

vegan twice baked potatoes

It’s really a super simple recipe. Bake the sweet potatoes until fork tender. While that is happening, cook the filling mixture. Then, slice and remove the sweet potato. Combine the sweet potato with the filling mixture.

twice baked potatoes recipe

Then, you fill the sweet potato shells back up with the filling mixture and then cook for 15 minutes more.

how to make twice baked potatoes

Then end result is a flavor packed meal. MorningStar Farms® veggie sausage is packed with plant protein power is the perfect way to start your morning off right. And while this is a great breakfast, it’s definitely doable for lunch or dinner too. As a meat lover, I’m here to tell you that this meal is for everyone! You have to taste it to believe it.

how do you make twice baked sweet potatoes

0 from 0 votes
Print
Twice Baked Sweet Potatoes with Sausage and Apples
Author: Andrew
Ingredients
  • 4 sweet potatoes washed
  • 4 tbsp coconut oil divided.
  • 1/3 cup sweet onions diced
  • 2/3 cup mixed bell peppers diced
  • 2 cloves garlic minced
  • 1/2 tsp smoked paprika
  • 1/4 tsp red pepper flakes
  • 2 sprigs of fresh sage 4-6 leaves
  • 2 cups apples diced (I used fiji and )
  • 5 MorningStar Farms® Original Sausage Patties (If vegan, use 8oz browned vegan sausage)
  • 2 tbsp maple syrup
Instructions
  1. Heat an oven to 400 degrees.
  2. Using a fork, poke holes throughout the sweet potatoes.
  3. Cook sweet potatoes on a baking sheet for 45-60 minutes or until a fork easily pierces through them.
  4. While that is cooking, in a large skillet on medium heat, add 2 tbsp coconut oil.
  5. Once melted, add in onions and peppers.
  6. Cook for 2-3 minutes.
  7. Add remaining 2 tbsp of coconut oil, garlic, paprika, red pepper flakes, sage, apples, and MorningStar Farms® Original Sausage Patties.
  8. Reduce to medium low heat and cook for 5 minutes, stirring often to prevent sticking.
  9. Flip the sausage patties over and cook for another 5 minutes, still stirring often.
  10. Add in 2 table maple syrup.
  11. Remove from heat and place into a large bowl.
  12. Cut the sausage patties into pieces.
  13. Once the sweet potatoes have finished cooking, remove from oven and let cool for 10 minutes.
  14. Reduce oven heat to 350 degrees.
  15. Slice length wise.
  16. Carefully remove the sweet potatoes from skin and put into bowl with sausage mixture.
  17. Gently mash the sweet potatoes (it's okay is some smaller chunks remain) and then combine well the sausage mixture.
  18. Add the mixture back to the sweet potato skins and cook again at 350 degrees for 15 minutes.
  19. Remove and serve. Can stay refrigerated for up to 3 days.

Enjoy!

thanksgiving twice baked sweet potatoes

You can find the MorningStar Farms® Original Sausage Patties and breakfast sandwiches that I featured in this post and other great veggie products at your local Walmart in the frozen section.

Filed Under: Breakfast, Dinner, Home, Recipes Tagged With: breakfast, lunch, recipes, sweet potatoes, vegan

Pear Pomegranate and Honeycomb Salad

December 27, 2017 by Andrew 2 Comments

This Pear Pomegranate and Honeycomb Salad is a delicious and light salad meal that pear well with a Citrus Vinaigrette.

Disclosure: This Pear Pomegranate and Honeycomb Salad shop has been compensated by Collective Bias, Inc. and its advertiser. All opinions are mine alone. #DonVictorHoney #HappyHealthyHoney #CollectiveBias

pear pomegranate and honeycomb salad

My biggest goal in life is showing my girls how to live a great life. How to make the best choices and always feel a sense of pride when you complete your goals. Shortly before we had our first daughter, I was diagnosed with pre-hypertension. I felt at first like I was doomed. Then, we had our daughter and I knew I had to fight harder than I ever had before. I was prescribed a medication for my condition, but I knew pretty early on in this journey, that I wanted to come off that medication. I was advised that weight loss, exercise, and better eating habits could all aid in that dream becoming reality.

Fast forward, and we now have a five and a two year old. I’m no longer on that medication. At the start of 2016, I vowed to do even better. Get even healthier. Show my girls what great exercise and eating habits looked like.

Turning a New Page

We’re heading into 2018 and I’m determined to live an even more amazing lifestyle. Larisha and I’s journey has always been about small changes to get to a healthier life versus drastic all at once.  We know that we are more likely to maintain our goals if we accomplish them this way. I’m successfully at a point where I’m happy with the way I look and feel and now it’s just about maintaining my current lifestyle while implementing more small changes to get even healthier.

Looking for small, better-for-me changes

One thing that I started doing about mid-year is eating a salad for dinner one night a week.  Typically, I’ve always just done lettuce, cheese, sunflower seeds, and croutons. It’s not really unhealthy, but it’s not really providing me with any benefits either.  Larisha and I began playing around with flavor combinations and I’m loving this Pear Pomegranate and Honeycomb Salad. It’s delicious and wholesome, as well as the crunch that I’d typically search for from croutons.

how do you use honeycomb

We’ve been using raw, natural honey for a while now, but never actually eaten the honeycomb. Now, it’s easily available at your local Walmart with Don Victor® Orange Blossom Comb Honey Globe Jar. Honeycomb is a guilt-free sweet and with Don Victor® Honey, you can get the superior taste at a cost affordable price.

spring salad ideas

5 from 1 vote
Print
Pear Pomegranate and Honeycomb Salad
Prep Time
10 mins
Total Time
10 mins
 

This Pear Pomegranate and Honeycomb Salad is a delicious vegetarian main dish salad recipe. It uniquely features honeycomb for an added crunch. 

Course: Salad
Cuisine: American
Servings: 2 people
Calories: 242 kcal
Author: Andrew
Ingredients
  • 1 Don Victor® Orange Blossom Comb Honey Globe Jar
  • 4 cups fresh spinach
  • 1/2 cup Pomegranate seeds
  • 1/2 cup feta cheese
  • 1 cup pears chopped
Instructions
  1. Pull the honeycomb out of the Don Victor® honey jar.
  2. Chop 1/2 of the honeycomb into pieces.
  3. In a large bowl, combine the spinach, chopped honeycomb, pomegranate, feta and pears.
  4. Drizzle with 2 tbsp of honey.
  5. Store leftover Don Victor® honey in a cool, dry place.
  6. Serve alongside a citrus vinaigrette or your other favorite dressing.
Nutrition Facts
Pear Pomegranate and Honeycomb Salad
Amount Per Serving (3.5 cups)
Calories 242 Calories from Fat 72
% Daily Value*
Fat 8g12%
Saturated Fat 5g31%
Cholesterol 33mg11%
Sodium 466mg20%
Potassium 439mg13%
Carbohydrates 39g13%
Fiber 3g13%
Sugar 32g36%
Protein 7g14%
Vitamin A 5785IU116%
Vitamin C 19.9mg24%
Calcium 251mg25%
Iron 2mg11%
* Percent Daily Values are based on a 2000 calorie diet.

summer salad recipes

Don Victor® Honey is raw, filtered honey, and not heated or processed in any other way. Learn more by following along on Facebook and Pinterest.

can you eat honeycomb

In addition to our salad, you can spread honeycomb on toast, pancakes, biscuits and more. Heating will make it soft to spread along the bread even though it doesn’t melt. You will love the aroma from the honey. Don Victor® honey is the perfect complement to new and more conscious recipes for the New Year. Buy one for yourself and buy one for someone else. Don Victor® Honey is found at Walmart in the Hispanic aisle. Head to your local store to grab today. We look forward to creating a more wholesome journey with you in the New Year!

Filed Under: Dinner, Home, Recipes Tagged With: dinner, lunch, recipes, salad

  • 1
  • 2
  • Next Page »


We're Parents is all about cooking and traveling our way through imperfect parenting. Learn More

SUBSCRIBE TO OUR WEEKLY NEWSLETTER & GET PARENT & ME COLORING SHEETS

Connect With Us

We're Parents is a unique mom and dad natural parenting blog focusing on topics such as breastfeeding, babywearing, and car seat safety. You'll also find Delicious recipes, inspired travel recommendations, and more as you journey with us through parenting. Learn More…

VIEW OUR PRIVACY POLICY

Even More Recent Posts

a black and white photo of a curly haired african american woman in a sweater holding a new born baby while standing up.

We’re Parents is a participant in the Amazon Services LLC Associates Program, an affiliate advertising program designed to provide a means for sites to earn advertising fees by advertising and linking to amazon.com

Copyright © 2026 · Foodie Pro Theme by Shay Bocks · Built on the Genesis Framework · Powered by WordPress

Rate This Recipe

Your vote:


A rating is required
A name is required
An email is required